Overview
Flipsnack’s Shopping List feature is a powerful tool for B2B and B2C businesses looking to simplify the purchasing process directly from their digital catalogs. Whether you’re a manufacturer, wholesaler, distributor, or retailer, this feature allows customers to browse products, add them to a shopping list, and send orders or requests for quotes—all within the catalog interface.
Table of contents:
How to use the shopping list feature as a seller
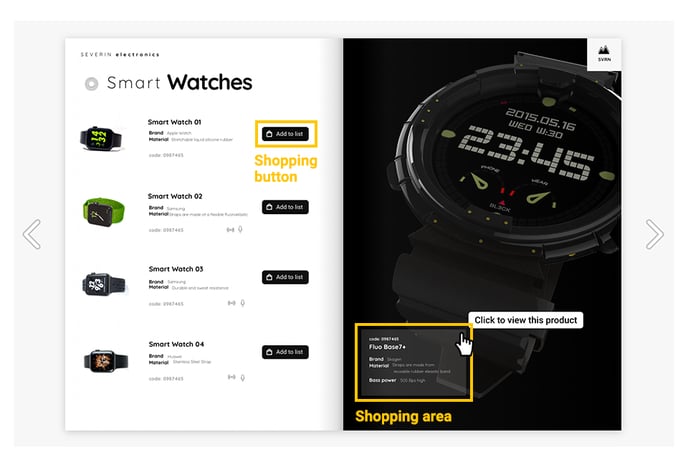
Shopping area and shopping button
Open overlay & add directly to list
How to use the shopping list feature as a customer

Once set, Flipsnack's Shopping List feature empowers customers, whether B2B or end consumers, to add products to a list in the catalog. They can then easily send the list as a purchase order or a quote via email, greatly simplifying the selling process.
The list can also be downloaded by the customer as a PDF or CSV or emailed to the seller at a later date. CSV format enables easy importing into spreadsheets or ERP applications.
Requirements:
-
Available in the Professional (Manual), Business (Manual), and Enterprise (Automated) plans.
How to use the shopping list feature as a seller
First log in, to the Design Studio, and once you’re logged in, click on Interactions on the left-hand side.

Shopping area & Shopping button
Once clicked, scroll down, and then you will see the Shopping area and Shopping button options in the Shop category.
First, you have the Shopping area button. This will allow you to drag an overlay over a certain area of your catalog where users can click to add an item to their shopping list.
For design purposes, you can also change the Shopping Area's opacity by going to the top right of the Design Studio and adjusting it.
The second option is to add a Shopping button. This is a CTA (Call to Action) button that also allows customers to add an item to their shopping list.

Regardless of your choice, you must click Add product, and a pop-up with product details will appear for you to set up.
Note: You can also automate your shopping list area & button to create more product catalogs.
Product details

You can add the following details for each product you include in your publication. You have to add these whenever you add a new product, but you can also modify them anytime by clicking on the element and then on Edit product.
-
Product title
-
SKU
-
Description
-
Pricing
Currency: When you open the currency toggle, you’ll see the available currencies. If your desired currency isn’t listed, simply type the currency name you want, and it will appear. Then, click on “Add [currency name]” to add it.

- Discount price: To highlight discounted products in your catalog, use the On sale toggle.
When enabled, the product is marked as on sale, showing both the regular and discounted prices (e.g., “50”) will also appear on the product pop-up.
.png?width=645&height=323&name=discounted%20prices%20in%20Flipsnack-mh%20(2).png)
-
Images: Add images related to the item selected. These images will be used in the pop-up, and you can select up to 15. Square images greater than or equal to 260x260 will work best and produce the highest quality. If you decide not to add a product image but to add an image for a variant of that product, the variant image will be displayed when viewing the product.
Below, click on Advanced options to open additional customization options. Here you can set up the following:
- Quantity options
Enable quantity: Toggle on or off. If on, the customer can adjust the quantity of the selected item in their list.
Enable min/max quantity: Toggling this option will allow you to set a minimum and maximum quantity that your customers can add to their shopping list for purchase.
Note: You can set higher quantity limits for individual products —up to 999,999 units
Restrict to MOQ multiples: Enforce orders for this product to be multiples of the Minimum Order Quantity (MOQ). E.g. If the MOQ is 100, acceptable order quantities include 100, 200,300, etc.
- Customizable product
If you sell products that can be personalized, like custom necklaces, mugs, or other customizable items, this feature allows you to easily add options for customers to personalize their purchases.
You can also check the Make personalization required option, making it mandatory for customers to provide customization details for their products.
.png?width=688&height=413&name=image-mh%20(8).png)
- Charge for customizable products
If you have customizable products, you can toggle on the Paid personalization, for example, with a flat fee (e.g., $20 per customization) or based on characters (e.g., $5 per letter, like for a football jersey).
You can easily configure pricing for customizable products directly through automation, choosing between a flat rate or per-character pricing. Additionally, you have the option to set a maximum character limit, giving you full control over how customizations are handled.
.png?width=688&height=434&name=image-mh%20(9).png)
- Attribute-based personalization
You can control when the personalization option appears based on the selected product variant, helping avoid confusion and only charging extra when needed.
To set this up:
-
Turn on the Attribute-based personalization toggle.
-
Select the attribute (e.g., Size, Color, or Material) where customization should apply.
-
Define the Option name customers will see (e.g., "Customize product").
For example, you can allow customization only for a "Large" size or a "Red" variant, ensuring buyers are prompted to personalize only when they choose a specific version.
.png?width=539&height=548&name=image-mh%20(47).png)
- Product attributes
For each product you add, you can include up to three different attributes. The default ones are size, color, and material. Additionally, you can create a Custom attribute to suit your specific needs.
Here's what that means specifically. For example, if you add an attribute containing sizes S, M, and L and colors red and blue, Flipsnack creates a unique variant for each, generating six variants.

You have flexibility when defining attributes: you have a total of 90 definitions that you can allocate freely across all attributes. For instance, you can use all 90 for one attribute (such as sizes) or split them however you need, like 80 for one and 10 for another, making it easier to accommodate complex product configurations.
Note: You must use Open overlay for the attributes to be visible to your customers. Add directly to list won’t allow your customers to choose their desired product variations.
- Product variants
To take things a step further, you can set individual (discount) prices and SKUs for each product variant. These product variants are based on the attributes added within the product attributes section.
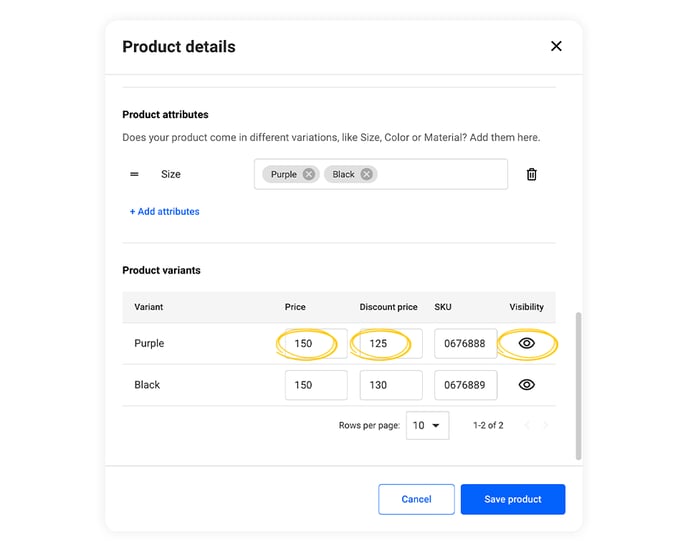
You can easily manage the visibility of your variants by clicking on the visibility icon. This eye icon from the right side, allows you to make a variant available or unavailable based on the stock you want to show to the clients.
- Manage individual variants
This enhancement allows you as a seller to set custom images, prices, and SKUs for each available variant and hide the ones out of stock when editing the product details pop-up.
Adding individual images based on attributes is useful for showcasing product variants effectively. For example, if you are selling sweaters available in multiple colors, it would be ideal to display each color version accurately. With variant images, customers can get a clear visual representation of each color option for the sweater, helping them to make an informed purchasing decision.

Here's how you can add specific images to individual attributes based on the attributes you already set in the previous step.
Note: You can add variant images for only one selected attribute.
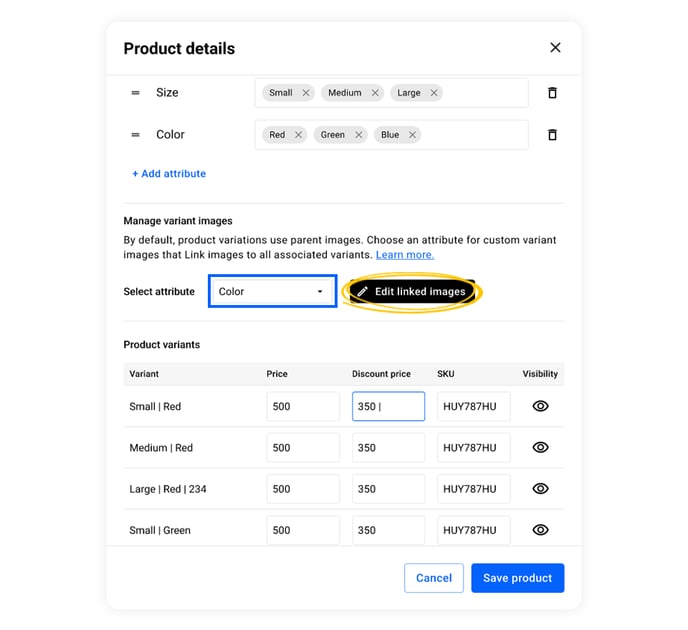
1. Choose the main attribute, from the drop-down.
2. Click on Link images button, next to the Select attribute.
3. Upload up to 15 images for each variant, and then simply go Back to product.
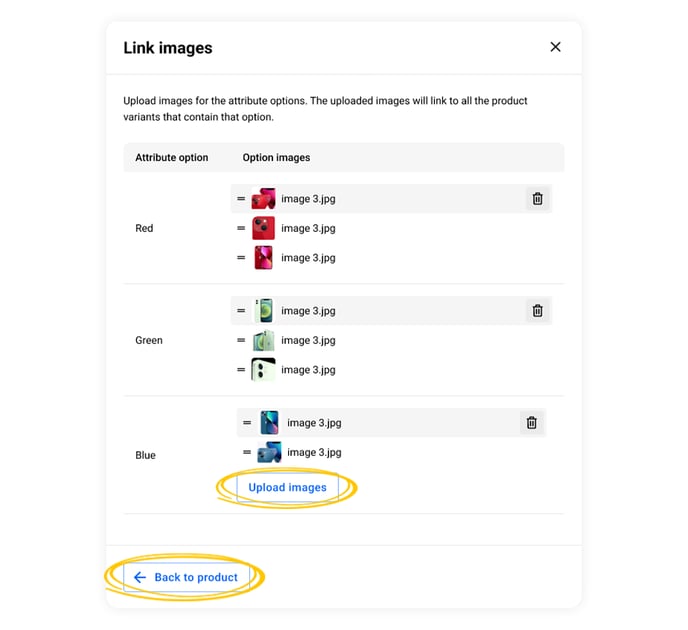
4. Set individual (discount) prices and SKU for each product variant (if needed).
5. Click on Save product.
Important: If you switch attributes after you finish adding images for your main attribute, this action will remove the images uploaded for the current attribute.
For more details on attribute automation, check this article.
If you decide not to add a product image but to add an image for a variant of that product, the variant image will be displayed when viewing the product.
Once you have added the product details, clicking on the shopping element will reveal additional options on the left side of the Design Studio.
Open overlay & Add directly to list
Whether you add a shopping area or a shopping button, you can choose between Open overlay and Add directly to list.
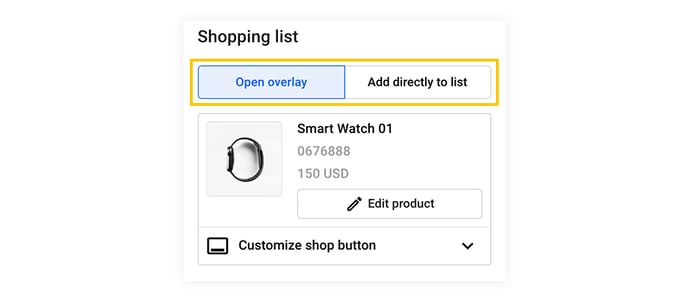
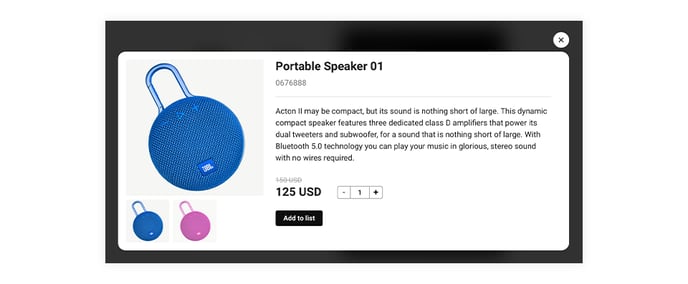
Open overlay will open a popup window containing your product details when the item is clicked. Here is how an open overlay button or shopping area will look within the catalog:
With Add directly to list, when a customer clicks the Shopping area or button, the product will be added directly to the shopping list. For this reason, you will not have the option to customize the shopping button or add a website button.
Customize Shop Button
Click on Customize button to customize the Shop button for the Shopping Area or Shopping Button. You can change the Button label, Button color, Text color, and Tooltip (which applies to Shopping Area only). Additionally, you can toggle a Secondary button to add a Button link and Button label.
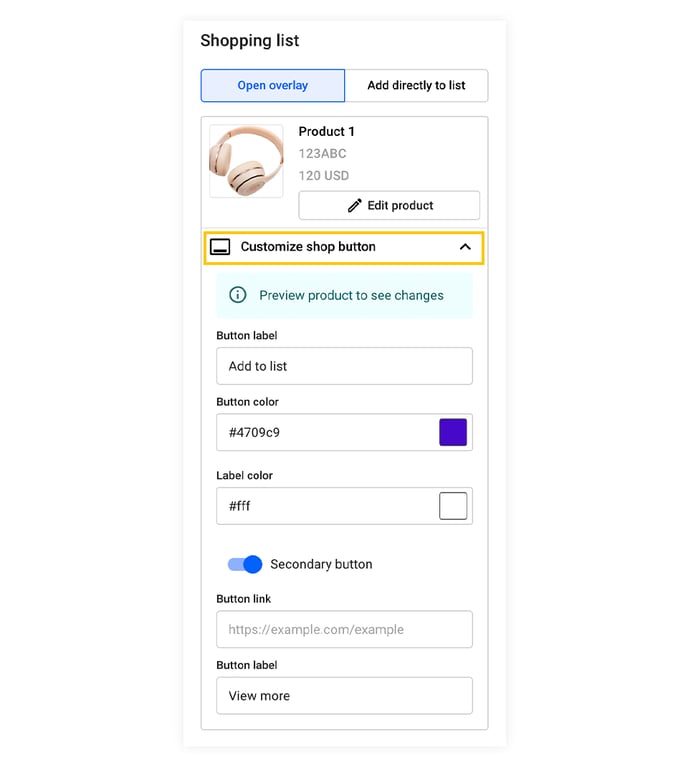
This Shop Button will also appear within the pop-up for both Shopping Button and Shopping Area when choosing the Open overlay option.
If you've finished setting up your first shopping list button or area, you can continue with the next one. Remember, you can use automation for the shopping list to make the process of creating your catalog easier.
Once you've set up everything about your shopping list, make sure you customize the order design and the mail where you want to receive all the orders.
Also, you can customize the catalog once you are done editing it. To do so, click on Customize. You can also toggle the Shopping list feature on or off by checking the Show shopping list option. With the shopping list disabled, customers can add products to their shopping list but can’t finalize the order.
Note: If you disable the shopping list, customers can add products to their shopping list but can’t finalize the order.

How your customers will use the shopping list feature
From the customer’s perspective, the shopping list feature is very straightforward. When viewing a catalog and seeing an item they want to add to their list, they can click the item or the CTA button.
Once the item is added, you can see your list by clicking the shopping bag icon at the bottom right of the flipbook player.

The shopping list will show the selected item and its quantity. Customers can remove the item above the quantity by clicking the trash can icon. They can also clear it entirely at the top by clicking Clear list.
To adjust how many units they want to purchase, buyers can use the – or + buttons next to the product image. The list automatically updates the subtotal and applies any visible discount, showing the final total clearly at the bottom.
.png?width=688&height=458&name=Shopping%20cart%20details%20for%20buyers-mh%20(2).png)
Shopping list in expanded mode
Clicking View details opens a modal that presents the shopping list in a larger, more detailed format. This layout includes:
-
Bigger product thumbnails for easier recognition
-
Full product information, including name, price, and description
-
A simplified, scannable view to quickly double-check selections

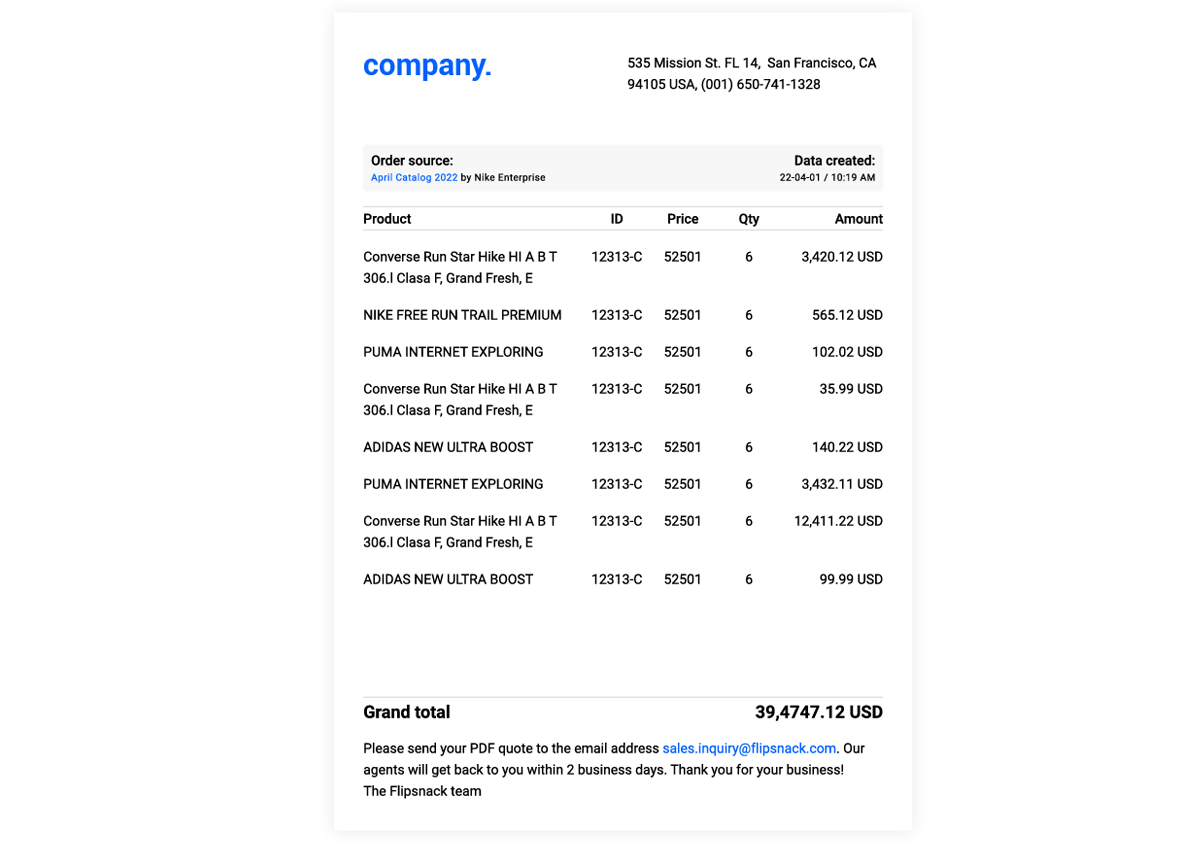
From here, they can send the order directly to you, the seller. They input the information that you require for the different check-out options. They can also download the order list as a PDF or CSV file and submit quotes, to have a copy of the sent order, or send their order via WhatsApp.
The PDF or CSV will contain the product name, product code, price, quantity, currency, and total. This will make dealing with larger orders much easier and help avoid miscommunication between the seller and the customer.
Next steps
Useful resources
If you want to learn more about the Shopping List feature and how to optimize your catalog to drive sales:
- Discover the different order and email customization options you can use for the shopping areas and shopping buttons.
- Find out how you can see the orders made through the Shopping List feature
- Automation for Shopping List to help you be more efficient.
-
Automate the export of shopping list orders to Google Sheets via Zapier
Need expert support?
Our team is here to help. Connect with our team experts or message us via the in-app chat for personalized assistance.