Overview
Creating a digital catalog that contains numerous products and product variants can be challenging and time-consuming.
To simplify the process and save you valuable time and effort, we have introduced an automated solution for the shopping list that allows you to easily create, populate, and manage your product catalog, regardless of the number of products and variants it contains.
Table of contents:
Download the Variant-Rich-Product template
Connect the product feed file to Flipsnack
How to use the product feed in your catalog
Filter by used or unused products in catalogs
Requirements:
- Plan: Enterprise
- Ideal for company size: Mid-market and Enterprise
Schedule a consultation with our product experts for personalized assistance.
Step-by-step guide
1. Download the Variant-Rich-Product template
For everything to work smoothly, we have created a CSV template you can download and then populate with your products and variants.
To find it, go to the main dashboard, click on Automation, on the left panel side, and click on Import feed.

Then, a pop-up will appear. You can import your product feed from Google Drive or upload it from your device. From here, you can download the templates for the product feed. You can use this sample as a base to build your datasheet, or start from a blank feed if you prefer.

2. Edit the product feed file
Once the template is downloaded, you can either import it into Google Sheets or open it with your preferred program, such as Microsoft Excel or Numbers.
Tip: We recommend using Google Sheets, especially if you regularly update your catalog, because, through Google Sheets, you can automatically sync your data. With the other methods, you must upload the file each time you make any changes to your feed.
After that, you can edit the feed and populate it with your products.
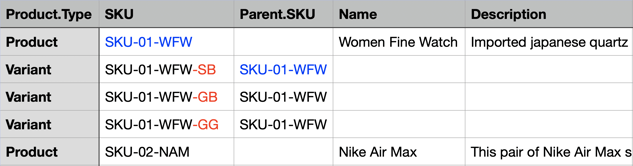
Important: When editing the downloaded CSV file, keep the first three columns (Product.Type, SKU, and Parent.SKU).
Here is a detailed list of each field from the CSV file you downloaded. The mandatory properties are mentioned as such. For properties that are not listed as mandatory, you can leave them blank if they do not apply to your catalog.
Important: The variations must always be listed as "Variant" in the Parent.SKU column, directly under their "Parent" in the order list. This means that if a variant row is placed above its parent row, it won’t work properly.
| Field | Explanation | Example | Instructions |
| Product.Type | The type of product (Product or Variant). | Product |
For products and variants The field is mandatory. You can add either Product (e.g. T-shirt) or Variant (e.g., blue). |
|
SKU |
Stock keeping unit for products and variants. |
SKU-01-WFW - SKU for the Product SKU-01-WFW-SB - SKU for the Variant(see the example below) |
For products and variants The field is mandatory. The SKU should be unique for each product or variant. |
|
|
|||
| Parent.SKU | Stock keeping unit of the parent product. | SKU-01-WFW |
Only for variants The field is mandatory. It should have the parent product’s SKU. Otherwise, the connection can’t be made between the product and its variant. |
| Name | The product name. |
Women Fine Watch |
Only for products If the information is added to the variant, it will be ignored, as the name will always be taken from the parent product. |
| Description | The product description. | Imported Japanese quartz movement keeps time accurate... |
Only for products If the information is added to the variant, it will be ignored, as the description will always be taken from the parent product. |
| Product.ImageURL | The product image. | https://cdn.flipsnack.com/images/automation/women-fine-watch-black.jpg |
For products You can add up to 15 images in the same row, but you have to separate them with a semicolon (;) The image link must end in either .jpg or .png, otherwise it will not work If you have trouble finding a correct URL, you can use the link from Design Studio. The product image link will automatically apply for variants as well. You can overwrite variant images by filling in the Variant.ImageURL field. |
| Price | The product price. |
35 35.5 |
Only for products The price will automatically apply to variants as well. You can overwrite variant prices by filling in the Variant.Price field. If you use a decimal separator, please use a decimal point, not a decimal comma. Do not use dollar signs ($); prices will not display if a dollar sign is included. We have a separate column for currency. |
| Currency | The product currency. | USD |
Only for products You can add a single currency for the entire flipbook, but you can modify the currency when editing the flipbook. If you change the currency, it will be applied to all products/variants. If you need to change the currency, we recommend doing so in the feed and then updating the feed in Flipsnack. If the sheet contains more than one currency, the first currency added will be applied to the entire flipbook. |
| Discount.Price | The discounted price for the product. | 25 |
Only for products Same rules apply as for Price (only numbers and period) |
| Visible | The visibility for the variants. | TRUE |
Only for variants You can choose between TRUE or FALSE If FALSE, the variant will be unavailable for purchase. If you leave the field blank, it will be set as TRUE by default, but set this field to FALSE if the variant is out of stock or if you do not want buyers to be able to purchase it. |
| Quantity | Enable or disable quantity | TRUE |
Only for products When set to |
| MIN.Purchasable.Quantity |
The minimum quantity available for purchase for the same product/variant. |
2 |
For Products It will also apply to the variants. If you have set a minimum quantity, you must also add a maximum one, otherwise, it will not work. |
| MAX.Purchasable.Quantity | The maximum quantity available for purchase for the same product/variant. | 3 |
For Products It will also apply to the variants. |
| MOQ | When products must be bought in packs or minimum quantities. | TRUE |
TRUE → enables quantity steps (multiples). FALSE → buyers can choose any number between the min and max E.g., if you have MIN.Purchasable.Quantity 2 and MAX.Purchasable.Quantity 10, and MOQ TRUE, the buyers can add only 2,4,6,8, or 10 items to the cart (multiples of 2, until they reach the maximum value, 10) |
| Attribute.Name1 |
The product attribute name. |
Color |
For Products You can add a maximum of 3 attributes. If your product does not contain variants, you can leave the field blank. |
| Attribute.Options1 |
The options available for Attribute.Name1. |
Product options: Silver;Black;Gold;Brown Variant options: Silver Black Gold
|
For Products and Variants You can include up to 90 attribute options in total (the limit is calculated for the 3 attributes in total; for example, if you add 90 options to the first attribute, the options for the second attribute will not be displayed)
Each option should be added on separate rows for each variant. |
| Attribute.Name2 |
The product attribute name. |
Size |
For Products Same as Attribute.Name1. |
| Attribute.Options2 |
The options available for Attribute.Name2. |
Product options: Small, Medium; Large Variant options: Small Medium Large |
For Products and Variants Same as Attribute.Options1. |
| Attribute.Name3 |
The product attribute name. |
Material |
For Products Same as Attribute.Name1. |
| Attribute.Options3 |
The options available for Attribute.Name3. |
Product options: Cotton;Polyester Variant options: Cotton Polyester |
For Products and Variants Same as Attribute.Options1 |
| Image.Attribute | The attribute that will be used for the image. | Color |
Only for products You need to choose a single attribute (if you have more than one) for which you want to add the images. E.g. if you’re selling T-shirts with the attributes Color and Size, the obvious choice would be to choose Color for the image attribute. This way, when someone selects the T-shirt in a different color, they will see a picture of the T-shirt in that particular color. Using different images for each size would not make too much sense since, visually, they all look the same. |
| Variant.ImageURL | The URL that will be used for the image attribute. | https://cdn.flipsnack.com/images/automation/women-fine-watch-black.jpg;https://cdn.flipsnack.com/images/automation/women-fine-watch-black2.jpg |
For variants You can add up to 15 images in one field, separated by semicolons(;). The field should be located in the same row as the attribute option to which you want to add images. E.g. If “Color” is your Add a variant row for each color. For example:
Repeat for each color (e.g., a “white” row with its own image links). Flipsnack will automatically show the correct images when a buyer selects that color. |
| Variant.Price | The price for the variants. | 30 |
For Variants You can add a different price for each variant. If you leave the field blank, the product's price (Price column) will be applied to the variant. |
| Variant.Discount.Price | The discounted price for the variants. | 26 |
For Variants You can add a different discount price for each variant. If you leave the field blank, the product's discount price (Discount.price column) will be applied to the variant. |
| Shop.Element | The type of element to be added to the catalog. | AREA |
Only for products The field is mandatory. You can choose between AREA, LINK and BUTTON. The Area element is an overlay. The Button element is a call to action button. If you leave the field blank, AREA will be selected by default. |
| Area.Element.Tooltip | The text displayed when you hover over the area element when browsing the flipbook. | Click here |
For Products Applicable only if you have selected AREA. If the field is blank, “Click to view this product” will be displayed. |
|
Area.Element.Color |
The color of the Area element. |
#7BC2FF |
For Products You must add a HEX Code. |
|
Area.Element.Opacity |
The opacity of the Area element. |
20 |
For Products You can select a value between 0 and 100. 0 = completely transparent. 100 = completely visible. |
|
Shop.Button |
The add to cart shop button. |
TRUE |
If you set it to FALSE, the add to cart/shop this item button will be hidden.
|
| Shop.Button.Color | The shop button color. |
#0362FC |
For products We recommend using the Hex Code. If left empty, the default color will be black. |
| Shop.Button.Label | The text displayed on the shop button. | Shop now |
For Products If the field is blank, “Shop this item” will be displayed. |
| Shop.Label.Color | The color of the text on the shop button. |
#ffffff |
For products By default, the color is set to white. |
| Website.Button | Find out how to prepare your feed for product variant automation and how to use the feed in your catalog | TRUE |
For Products Visible when you click on the area or button element. You can choose between TRUE or FALSE. If the field is blank, FALSE will be used. |
| Website.Button.Label | The text displayed for the website button. | Our website |
For Products It can be used if Website.Button is set to TRUE. If the field is blank, “View more” will be displayed. |
| Website.Link | The URL used when the website button is clicked. | https://www.flipsnack.com/ |
For Products If you don’t add a link, the button will not be displayed, even if you set its value to TRUE. |
| Customizable.Product | Personalization for the product. | FALSE |
Set this field to TRUE if the product allows personalization (e.g., “Add your name”). |
| Customizable.Product.Instructions | Instructions for personalization. |
This is a short message or guide for buyers, for example: “Write your message or initials below.” It appears inside the personalization box in the shopping modal. |
|
| Customizable.Product.Flat.Fee | Personalization fixed cost. |
A fixed extra cost for personalization. Example: If you charge $2.50 for engraving, enter |
|
| Customizable.Product.Per.Character | Charges a price per character typed by the buyer |
Charges a price per character typed by the buyer (e.g., $0.10 per letter). If you fill in both |
|
| Customizable.Product.Character.Length | The maximum number of characters a buyer can type |
Numbers only. Sets the maximum number of characters a buyer can type (e.g., 20). |
|
| Customizable.Product.Mandatory | Personalization required or no. |
Set to TRUE if personalization is required (the buyer must fill it out to purchase). Leave FALSE if it’s optional. |
|
.png?width=146&height=70&name=image%20(24).png)

Once you have edited the file, it is time to upload it to Flipsnack.
Important: If a specific variant differs from the main product in details such as price, image, or visibility, you need to list it manually in the feed. Otherwise, all variants will inherit the main product's details (price, image, etc.) by default.
3. Upload the product feed file to Flipsnack
To do so, go to the Main dashboard, click on the Automation panel ---> Import feed.
Now, either click on the Upload CSV file or Google Drive.

Note: If you plan to update the catalog data regularly, we recommend using the Google Sheets option. In this case, instead of uploading the file for each modification, you can simply click the Sync button, learn more about synchronization here.

4. Sync your product feed
If you uploaded a CSV file, you won't find the sync button(as shown in the image above). To update the catalog after making changes, you need to re-import the same CSV file updated. You can replace it here or from the Design Studio in the Automation panel.
If the CSV file has the same name, a pop-up will appear, asking whether you want to overwrite the existing feed or not.
Find more about synchronization in this article.
Note: For those who have access to the AI features ( starting Professional plan), the mapping works automatically; you don't have to do anything, only to make a quick check that everything is mapped as you wanted.

If you have modified the column header names in the feed and tried to sync it, the change will be reflected by an error message. .

Note: As already mentioned, we recommend not changing the fields because, for each modified field, you will need to assign the new data manually. Given the large number of properties, this process can be time-consuming and lead to errors.
5. How to use the feed in your catalog
Once your file has been imported into Flipsnack, you can easily use it in your product catalog.
While in the Design Studio, pick the catalog you want to use. Click on Automation. Here, you will be able to see your uploaded product feeds, how many products and feeds are used in a catalog.

Once select the feed you want, you can easily drag and drop a product on the page, and when you do so, a Shopping list element will be created. To preview the product, click on the Preview button in the upper right side.

Filter by used or unused products in catalogs
You can easily filter products to see which ones are already used in your catalog in the Automation tab and which ones are not. This is especially helpful if you're unsure which products you've already added
.png?width=304&height=474&name=image-mh%20(86).png)
FAQ
Why can't I view the product variants?
Make sure to use the template that we offer when adding variants.
Are there any limitations on the number of products or variants that can be automated in Flipsnack?
Flipsnack does not have a limit for the number of products that can be added to a feed; however, you can only add 3 attributes (eg, color, material, size)
What kind of images are accepted?
Accepted formats include JPG, PNG, and GIF. Add images by placing direct URLs in the appropriate column of your feed. Learn more.
Next steps
Useful resources
Take your digital content strategy to the next level with data-driven insights and best practices to improve your processes:
- Prepare your feed for Flipsnack automation
- Automation for product variants
- How to create a product catalog using the Product Catalog Generator
- How to use synchronization for Automation in Flipsnack
- How to create product catalogs from scratch using a product feed
- How to turn your PDFs into shoppable catalogs and automate the process
Need expert support?
Our team is here to help. Connect with our team experts or message us via the in-app chat for personalized assistance.