Table of contents:
Import product feed in Flipsnack
Working with multiple product feeds
Preparing your file for Product tag automation
Key benefits:
- Reduce production time by up to 70%
- Eliminate manual data entry errors
- Enable real-time content updates
- Scale operations efficiently
If you have decided to use our automation tool for your catalog production-specific needs, please follow the steps to prepare your product data feed.
Our automation tool supports multiple types of files: CSV, XLSX, and Google Spreadsheets.
Requirements:
- Plan: Enterprise
- Ideal for company size: Mid-market and Enterprise
CSV is a commonly used file format that contains numbers and text in a spreadsheet format. It's generally used for data transfer between various programs or apps. CSV files can be created, edited, and opened with Google Spreadsheets, Microsoft Excel, Numbers, or other similar programs.
One thing to keep in mind, if you are using a Mac, ensure that the Number Format is set correctly before exporting your file as a CSV to avoid import issues:
- Go to System Settings in your device > Language & Region
- Scroll down to Number Format
- Select 1,234,567.89
- Once updated, proceed with exporting your spreadsheet as a CSV file.

If you plan on updating your data in your catalog multiple times, Google Spreadsheet might be the best option because you can update your data on Flipsnack with a simple click on "Sync" instead of re-uploading a file.
Step-by-step guide
1. Creating the product feed
As a starting point, go to the Automation panel on the left side of the app.
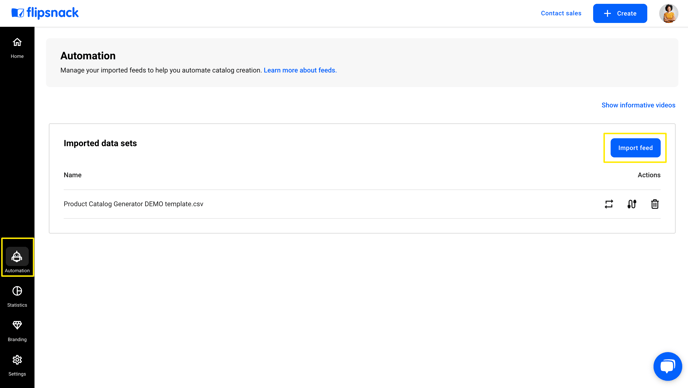
Here, click on Import feed, and a pop-up will appear. You can import your product feed from Google Drive or upload it from your device. From here, you can download the templates for the product feed. You can use this sample as a base to build your datasheet, or start from a blank spreadsheet if you prefer.

Tip: There will be two ready-to-use templates from Flipsnack: the Simple Product Feed and the Variant-Rich Product Feed. These come pre-mapped for easier setup.
2. Import product feed in Flipsnack
Now, either click on the Upload CSV file or Google Drive.

Note: You can also import the feed directly into Design Studio by going to the Automation panel and clicking the Add feed button. Once imported, you can choose between Google Drive or Upload CSV from your device.
After you import the data spreadsheet. Here are some aspects you need to keep in mind:
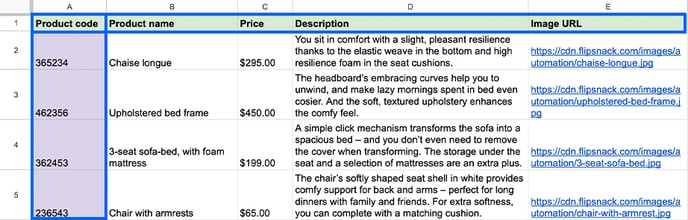
If your data spreadsheet contains products, each product should be listed on a separate row, and each column should contain a specific type of information. Some examples of column headers could be SKU number, Size, Color, Fabric, Price, etc.
- You can add as many columns as you wish and name them however you want.
Note: Do not use quotation marks ( “ ” ) in your datasheet. Use double apostrophes ( ‘’ ) instead. Using quotes can cause feed upload issues.
- It's important to know that the information will appear in your flipbook exactly as it was entered in your spreadsheet, so pay attention to capitalization.
- If you want to use images in your catalog, you need to add them as image links in your file.
Note: For reliable image URLs, you can copy the link directly from Design Studio → Uploads → Select the image and click on the 3 dots → Copy link.
- If you plan on adding links in your automated catalog, add a column for product links and insert the links that will take the customer to your e-commerce website.c
After uploading your product feed, you can select the attributes that you want to see displayed in your product list.
If your columns have the same names as those in the mapping modal (and demo template), they will be mapped automatically. If not, for example, if you have "Title" instead of "Name," we will use AI to map the columns. Please make sure that everything is mapped correctly.
Important: At the unique ID, select SKU as the mandatory identifier for all feeds. You must set it immediately after uploading your file. If you cancel the SKU modal, your feed will be deleted.
.png?width=688&height=749&name=image-mh%20(99).png)
Warning: If you update a spreadsheet that is connected to a flipbook, do not make any changes to the field set as the Unique ID. For example, if you have set the unique ID to the SKUs/ID numbers/Product codes, similar to the image below, these should not be modified. You can add additional products and codes, but the existing ones should not be changed. Additionally, do not change the name of the column containing these IDs.
Since these elements have already been mapped, modifying them will impact the mapping and design of the catalog.
To include images, you can host the images directly in Flipsnack. Please read this article for more details.
Working with multiple product feeds
If you have multiple product data feeds, you can add them.
Let's say you already have a template ready to be populated with your products, and the template is connected to your data source. Now you plan to reuse this ready-made, smart template with a different datasheet. Will it work?
Yes, it will, but only if you keep the same column headers for your new data file. If the same type of information is listed in your file under a different name, it will not work. For example, if a text box is set to display the information in the column "Price" and the new data file lists prices as "US Price," the system will not be able to match the information.
Sync your product feed
Flipsnack’s sync feature keeps your feed and flipbook aligned automatically, and you can see it in the Automation panel in Design Studio.
Sync is based on the SKU. If the SKU is missing or changed, Flipsnack can’t update your data.
The Sync button (found in both the Automation panel and Design Studio’s side panel) updates the feed and lets you choose whether to update the products already placed in your flipbook.
In the Automation panel, click on a feed that was imported from Google Drive -> Sync feed ->
After the sync is done, a modal appears where you can choose to update the products in the flipbook too; otherwise, only the feed will be updated.
Note: If you uploaded your feed as a CSV, you’ll see a Replace button instead of Sync. This re-uploads your file, replacing the old version.
.png?width=620&height=745&name=image-mh%20(100).png)
-
Reordering products in the feed reorders them in the side panel, but not in existing layouts. The new order applies only when generating a new catalog.
Preparing your file for product tag automation
You could use the following column headers in your file: Product title, SKU, Description, Price, Discount price, Product URL, Button label, Image 1, Image 2, and Image 3.
You don't have to use the same names, but go with something similar that will help you match the information from your file with the product tag fields.
It's unnecessary to add all of these columns if you don't want some type of information to appear in your product tag. For example. You can simply skip the button label and product URL if you don't want to link to an external webpage. The same goes for images, prices, or discounted prices. It's up to you what to include; there are multimedia elements you can automate to showcase your product better.
Next steps
Useful resources
Take your digital content strategy to the next level with data-driven insights and best practices to improve your processes:
- Prepare your spreadsheet for Flipsnack automation
- Automation for product variants
- How to create a product catalog using the Product Catalog Generator
- How to use synchronization for Automation in Flipsnack
- How to create product catalogs from scratch using a product feed
- How to turn your PDFs into shoppable catalogs and automate the process
Need expert support?
Our team is here to help. Connect with our team experts or message us via the in-app chat for personalized assistance.