Table of contents
- Create a bookshelf
- Access the bookshelf settings
- Share your bookshelf
- Customize the look and behavior
- Embed your bookshelf
- View analytics
- Send bookshelf via email
- Send the bookshelf via QR code
- Delete your bookshelf
- Navigate your bookshelf
Overview
Bookshelves in Flipsnack allow organizations to create customized collections of digital publications, making it easier to organize and share multiple flipbooks in a professional, branded format. This guide will help you understand how to create, customize, and manage bookshelves effectively for your business needs.
Benefits
- Digital library management: Store and organize all your publications in one professional, branded space.
- Simplified sharing: Share multiple publications privately with a single link or embed them on your website.
- Professional reading experience: Provide customers and partners with a smooth, consistent way to browse your content.
- Performance analytics: Track engagement metrics for each publication in your collection to optimize content strategy.
Requirements
- A published or unlisted flipbook in your Flipsnack account
- Professional plan or higher for bookshelf and statistics access
- Business plan or higher for branding customization
- Intended for workspace owners and editors
Step-by-step guide
1. Create a bookshelf
- Go to the main dashboard and click the Create button in the top-right corner
- Select Bookshelf from the dropdown menu:

- Select from your published flipbooks each flipbook you want to include and click Next step.

- If needed, rearrange your flipbooks by dragging and dropping them, then click Share now.
Note: You can only add published and unlisted flipbooks to a bookshelf. Once a bookshelf is made public, it cannot be changed to unlisted.
 In the publishing modal:
- Enter a title for your bookshelf
- Add a description
- Set the visibility to Public or Unlisted
- Click Publish now

Note: If you ever decide that you no longer want a flipbook from the bookshelf to be available to everyone, there are a few options you can consider:
- Change the visibility setting for the flipbook
- Remove the flipbook from the bookshelf
Here's what an embedded bookshelf looks like:
Looks super clean, right? See how it looks as a full-view link bookshelf, too.
2. Access the bookshelf settings
Once you've created and published your bookshelf, you'll land on its Overview page — the control center for everything related to that bookshelf.
Settings are divided between two areas:
- In the right-hand panel, you will see the following: Share, QR code, Embed code, Send via email, Customize preview, and other options.

The bottom of the bookshelf previews - you can see the stats from the last days. It also shows bookshelf details like title, status (e.g. Public), last updated time, publish date, and who created it.
You can click Edit to update the title or description, or View detailed analytics for deeper insights.

3. Share your bookshelf
In the left panel, click on Share, and a pop-up will appear. This is where you decide how to share the bookshelf:
You can:
- Copy the public or unlisted link and share it manually
- Make a QR code
- Embed code for your website or other platforms
- Share it on social media

There's also a QR code option available both in the pop-up and in the right-side panel..png?width=670&height=322&name=bookshelf%20overview%20-mh%20(1).png)
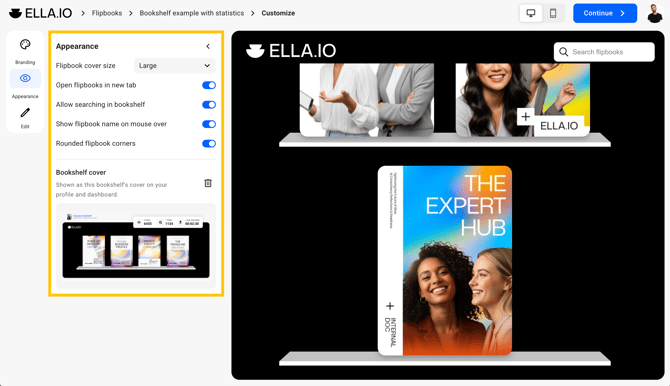
4. Customize the look and behavior
To fully brand your bookshelf, go to the Customize section from the left panel or the preview controls.
Here's what you can adjust:

Branding tab:
- Logo: Upload, link, replace, or delete your logo.
Note: Logo upload is available with Business and Enterprise plans.
- Background: Choose a transparent, solid color, or image background. Solid colors can be selected via HEX code, default palette, or team colors. Images can be positioned using scale-crop, center, or tile.
- Shelf color: Customize using the same options as above — great for aligning with your brand palette.
Appearance tab:
- Flipbook cover size: Choose between Small, Medium and Large covers to adjust how many flipbooks will fit on one row.
- Open flipbooks in new tab: Toggle this to open flipbooks in a new tab when the user clicks on their cover.
- Search in bookshelf: This toggle adds a search bar in the top right corner that can be used to search for flipbooks based on keywords you can find in them.
- Show flipbook name on mouse hover: Display the flipbook name on hover for more context.
- Bookshelf cover: The cover is displayed both in the dashboard and on your public profile page, making it easier to visually distinguish bookshelves.
- Rounded flipbook corners: Toggle between rounded or square corners for your flipbook covers on the bookshelf.
Note: Want to add, remove, or reorder flipbooks on your bookshelf? Click the Edit tab, where you can reorder flipbooks or select publications.
Once you’re done, click Continue and publish your bookshelf.
Important: If these options don’t work on older bookshelves, republish the shelf first. Go to Edit, click Share now, then Publish now. After that, you'll be able to customize it properly.
5. Embed your bookshelf
To embed the bookshelf on your website, select Embed from the left panel.
Here, you can:
- Choose the embed size
- Copy the embed code
- Restrict where it appears by enabling domain restrictions — add allowed websites manually

6. View analytics
To check the performance of your bookshelves, you can view the statistics for individual bookshelves.
Note: Available from Professional plan.
- From My flipbooks, select the bookshelf you're interested in.
- Click on Analytics.
.png?width=670&height=71&name=analytics%20bookshelf-mh%20(1).png)
Here, you will find general bookshelf stats for the bookshelf link and for the flipbooks within the bookshelf.
In general bookshelf statistics, you can find information about how your bookshelf performs overall. This includes:
- Views
- Impressions
- Average time spent
To check the statistics of the flipbooks within the bookshelf, go to Flipbooks within and click on each flipbook to view complete information about its performance.
You can also see analytics like:
- Location
- Sources
- Device
- Channel

Note: You can download the analytics from each section as a CSV file.
7. Send bookshelf via email
Choose Send email from the side panel to build a fully branded message.
.png?width=670&height=322&name=bookshelf%20overview%20-mh%20(2).png)
You can:
- Add your logo, title, description, and custom label
- Set background and accent colors
- Preview and send it directly. Or, embed the bookshelf into your own email client using the snippet from the Embed section

Important: Fully branded emails are available with Business and Enterprise plans.
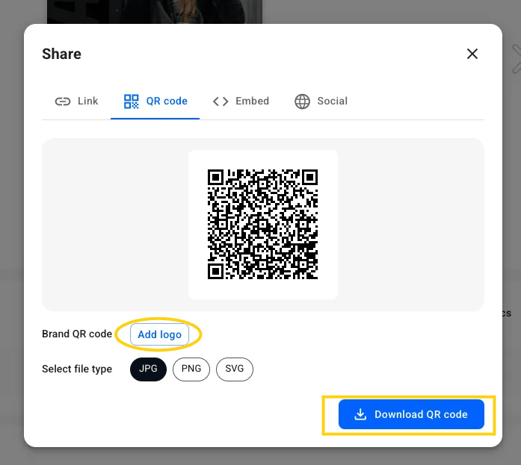
8. Send bookshelf via QR code
Whether for print or digital campaigns, you can generate a br anded QR code linked to your bookshelf. Find this option on the left-hand menu and at the bottom of the page while in the Details preview.

Once you click on Generate QR code, you have these options:
- Download it in multiple formats
- Add your logo for consistent branding
9. Delete your bookshelf
Deleting your bookshelf will not impact the publications within it or remove them from your account. Each publication will remain unchanged.
To delete a bookshelf, go to your Dashboard, hover over the bookshelf, click the three-dot menu, and select Move to trash.

10. Navigate your bookshelf
Bookshelves are fully accessible with keyboard navigation and screen reader support.
To begin:
- Go to My Flipbooks in your main dashboard.
- Hover over the bookshelf you want to access and click View.
.png?width=670&height=71&name=analytics%20bookshelf-mh%20(2).png)
Once inside the bookshelf:
- Use the Tab key to move through the flipbooks.
- When you reach the one you want, press Enter to open it.

Note: We've updated the bookshelf navigation to provide a smoother, more seamless browsing experience. Instead of clicking through individual pages to view your entire collection, readers can now enjoy a continuous scrolling experience.
Troubleshooting tips
- If unable to customize older bookshelves, republish them through the Edit menu
- For visibility issues, verify individual flipbook settings
- When embedding fails, check the domain restriction settings
Next steps
- Bookshelf statistics
- Add your bookshelves under your custom domain
- Add teammates to create bookshelves together
- How to generate a QR code for your flipbook?
- How to brand your bookshelf
Need help? Our team is here for you. Contact our team experts or message us via the in-app chat for personalized assistance.