Table of contents
Overview
Flipsnack’s redesigned bookshelf interface provides a streamlined workspace to organize and brand your flipbook collections. By utilizing the Branding, Appearance, and Edit features, you can transform a simple list of documents into a professional digital library that aligns with your corporate identity, enhancing reader engagement and trust through a cohesive visual experience.
Requirements
Pricing Plan:
- Professional plan or higher for bookshelf and statistics access
- Business plan or higher for branding customization
Use cases
-
Internal communications: Centralize company handbooks and HR policies in a single branded hub for employee access.
-
Product catalogs: Organize seasonal or regional catalogs in a searchable library for B2B buyers.
-
Sales enablement: Provide sales teams with a "Sales Kit" bookshelf containing all current brochures and presentations.
How to brand and manage your bookshelf
To brand and manage your bookshelf, you have two primary entry points from the My Flipbooks page: the Customize button for visual settings and the Edit button for content management.
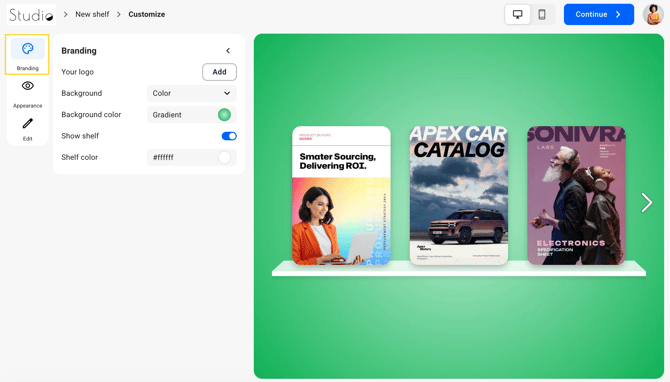
Branding settings
To access these settings, hover over your bookshelf card and click the Customize button. This opens the redesign workspace with a live preview and a sidebar.
Note: All bookshelves now feature continuous scrolling instead of page-by-page navigation. Browsing feels effortless as readers flow through your entire collection in one smooth motion, making it much faster to find and open publications in large collections.
-
Click on the Branding tab in the left sidebar.
-
Logo:
-
Click Replace to upload your company logo (.PNG or .JPG).
-
Click the trash icon to hide the logo.
-
-
Logo link: Enter your website URL in the text field to make the logo a functional navigation element.
-
Background: Customize the backdrop of your bookshelf:
-
Solid: Choose a single brand color using a HEX code or the color picker.
-
Gradient: Select two colors to create a professional blended effect.
-
Image: Upload a high-resolution image. You can adjust the fit and position to ensure it scales correctly across different devices.
-
- Show shelf: Choose whether to display the shelf graphic or hide it for a cleaner, minimal look.
-
Shelf color: Change the color code of the shelf underneath the flipbooks.
- Rounded flipbook corners: Toggle between rounded or square corners for your flipbook covers on the bookshelf.
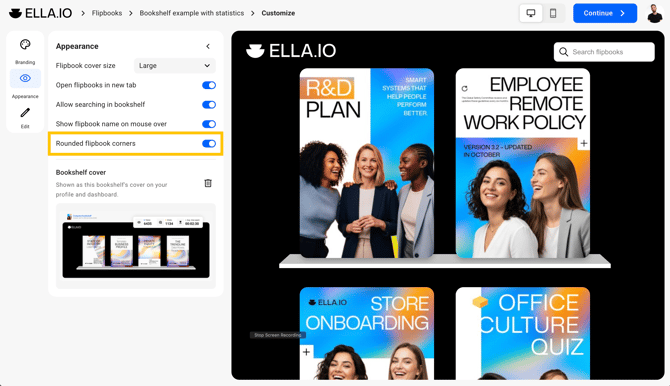
Appearance settings
The Appearance tab is also found within the Customize workspace:
-
Click on the Appearance tab in the left sidebar.

-
Flipbook cover size: Choose between Small, Medium and Large covers to adjust how many flipbooks will fit on one row.

-
Open flipbooks in new tab: Toggle this to open flipbooks in a new tab when the user clicks on their cover.
-
Search in bookshelf: This toggle adds a search bar in the top right corner that can be used to search for flipbooks based on keywords you can find in them.
-
Show flipbook name on mouse hover: Display the flipbook name on hover for more context.
- Bookshelf cover: The cover is displayed both in the dashboard and on your public profile page, making it easier to distinguish bookshelves visually.

How to manage bookshelf content (Edit)
The Edit button on the dashboard is used specifically for managing which publications are included in your collection:
-
Manage selection: A new tab will open with your flipbooks. Select and deselect the check mark to add or remove flipbooks from the bookshelf.
-
Organize flipbooks: Use the drag-and-drop handles on the left side of each flipbook entry to arrange them in your preferred sequence.

Additional tips
-
Logo recommendation: For the best results, use a transparent PNG file with a 5:1 aspect ratio.
-
Live preview: The central workspace updates instantly as you adjust settings or change background colors, allowing you to preview designs before saving.
-
Bookshelf name: You can edit the public-facing title of your bookshelf directly in the top bar of the Customize page.
Troubleshooting
What to do if the "Save changes" button is disabled?
Ensure you have made at least one modification to the settings. If the button remains grayed out, try refreshing the page or checking if your user session has timed out.
What to do if the background image is blurry?
Upload an image with a minimum width of 1920px. Smaller images will stretch to fit the viewer's screen, causing pixelation.
Frequently asked questions
-
Can I brand different bookshelves with different logos? Yes. Branding and appearance settings are applied on an individual bookshelf basis, allowing you to create tailored libraries for different clients or departments.
-
Is the new layout mobile-responsive? Yes. The grid automatically adjusts based on the reader's screen size, ensuring your branded library looks professional on phones, tablets, and desktops.
Next steps
Need help setting up your bookshelf?
Our team is here to help. Connect with our team experts via the in-app chat for personalized assistance!