
Overview
Create, publish, and share content more effectively by setting up your team in Flipsnack. Give each teammate the right access level, keep your content secure, and work together smoothly, all from one simple dashboard.
💡 Benefits of adding team members to your workspace
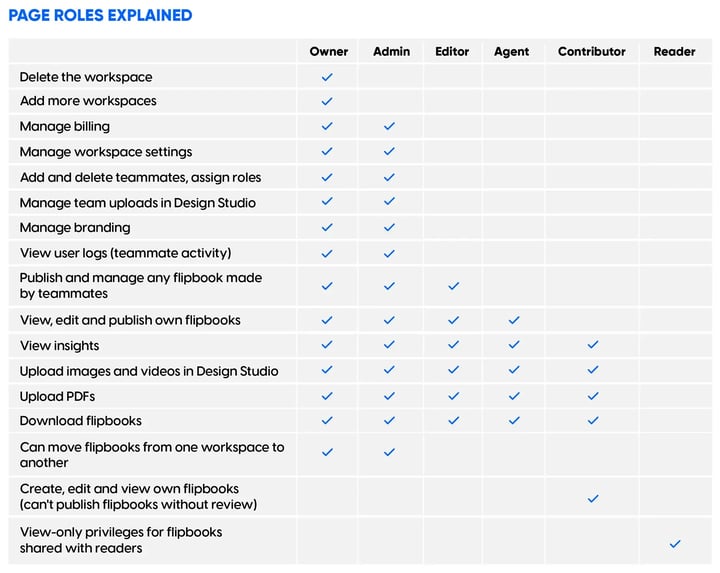
- Five roles: Owner and Admin reach Billing and Settings. Editor edits every flipbook but not Billing. Agent sees only their own flipbooks. Contributor creates and edits their own but cannot publish them.
- Publishing stays a decision: a Contributor's flipbook waits for an Owner, Admin or Editor, so nothing reaches readers unreviewed.
- 1,000 teammates in one CSV: two columns, email and role, capped by the seats your plan carries.
- Nobody leaves with the files: remove a teammate and the flipbooks they made transfer to the workspace owner.
Requirements
- Plan: Enterprise: contact sales
Adding teammates
- Click the Settings icon in the lower-left corner of your dashboard
.png?width=720&height=660&name=image-mh%20(77).png)
- Select the Teammates tab and then click Add teammate
.png?width=720&height=396&name=image-mh%20(78).png)
Here you have two ways to do this:
Add teammates manually
Click the Add teammates button to manually invite new users by entering their email addresses.
.png?width=720&height=517&name=image-mh%20(79).png)
After you added the email addresses, each teammate can be assigned one of the following roles:
- Admin - has the same access as the owner, but there can be multiple admins.
- Editor - has full flipbook editing permissions. Does not have access to Billing and Settings.
- Agent - has access to their own flipbooks. Does not have access to Billing and Settings.
- Contributor - can create, edit and view their own flipbooks, but they can only be published by the Owner, Admins or Editors.
After, click on send Send invite.
Note: Your team can start working right away, and everyone gets exactly the access they need to do their job.
Import the CSV list with your teammates
1. First, you need to prepare your CSV list. The file must include two columns:
- Email address of the teammate.
- Role assigned to that teammate (use lowercase for roles).
Accepted roles
Use one of the following role names exactly as shown:
- admin
- editor
- agent
- contributor
Important: If a role is not specified in the CSV file, the system will automatically assign the Admin role to that teammate by default. Make sure to define roles explicitly in the CSV if you want to avoid assigning admin access unintentionally.
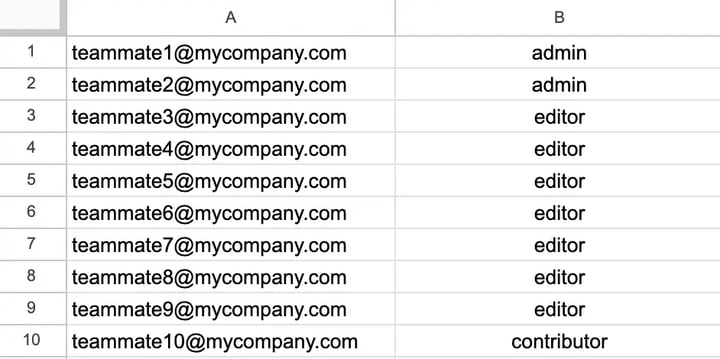
Note: Maximum number of rows per CSV file: 1000 teammates. However, only the number of teammates allowed by the workspace plan will be imported, even if your CSV includes more.
The actual number of users that can be added to your workspace depends on:
- The subscription plan you’re on
- The number of seats you purchased.
2. Then, go back in the app, and use the dropdown arrow to reveal the Import from CSV option for bulk additions.
.png?width=720&height=396&name=image-mh%20(80).png)
Understanding team roles
Management roles
Owner- The person who created the account
- Can do everything in the account
- There can only be one owner
- Can manage settings and billing
- Can add or remove teammates
- Can change subscription details
- Perfect for team leaders
Workspace manager
- this is a free user - only available on request with the Enterprise plan.
- exclusively focused on workspace management
- for this role, the access is limited to:
- teammates management and activity logs
- readers management
- groups
- Single Sign-on (SSO)
- permission settings
- workspace access management
Content creation roles
- Editor
- Can work on all flipbooks
- Can't access billing or workspace settings
- Great for design teams and content creators
- Agent
- Can create and manage their flipbooks
- Works only with their content
- Good for individual teammates
- Contributor
- Makes their flipbooks
- Needs approval before publishing
- Uses "Ask for review" instead of "Publish"
- Perfect for freelancers or contractors
Note: The access to billing or other settings are customizable from the Permission settings page.
Special access role
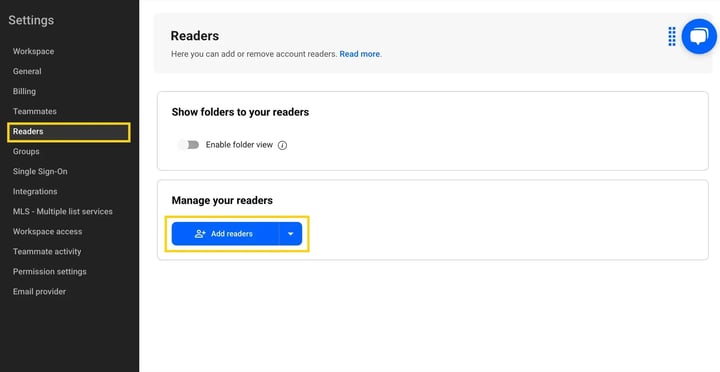
The Readers section allows workspace owners and admins to give specific people access to view flipbooks, without giving them editing or publishing rights. You can add readers manually or import via CSV for bulk actions.
- Can't create or edit anything
- Great for sharing with clients or stakeholders
Tip: This is a feature on request. Our team is ready to help you set this up.
Education Roles
- Teacher
- Complete control of the account
- Can add or remove teammates
- You can have multiple teachers
- Student
- Can create and edit their flipbooks
- Can't access settings or add teammates
- Perfect for classroom use
Managing team access
Keep track of who's on your team:
Checking Invites:
- Look in Settings → Teammates to see everyone's status
- Accepted means they're active
- Pending means they haven't joined yet
- Need to resend an invite? Just click Resend invite
.png?width=720&height=388&name=image-mh%20(81).png)
Note: The Owner of the workspace is included in the teammate list but has collaboration disabled. They cannot be edited or reassigned.
Removing teammates
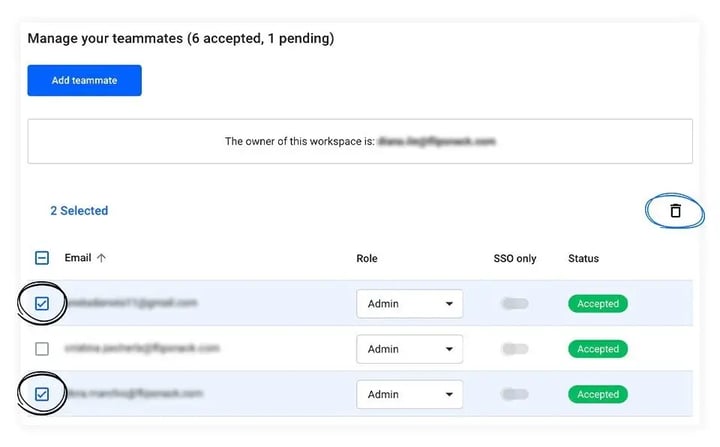
- Go to Settings → Teammates, as we described at the beginning of the previous section (Adding teammates)
- Check the boxes next to teammates
- Click the Delete icon
- Choose who gets their flipbooks
Note: The flipbooks stay in your workspace
When teammates get deactivated
1. If you added teammates and later move to a plan that does not support teammates, we will deactivate all previously set teammates and allow you to decide how to proceed:
- You can either upgrade your plan to reactivate teammates
- Or delete the deactivated teammates by following our standard deletion flow
2. If you transition from an Enterprise plan that includes, for instance, 8 teammates to a Business plan that only accommodates 4 teammates, all existing teammates will be deactivated. You will have the option to reactivate any 4 of your choosing, while the other will remain deactivated. To maintain all your teammates, you will need to either upgrade your plan or remove the deactivated teammates following our standard deletion process.
Important: In any case, when we deactivate teammates, we notify users via email.
Tools to keep your team organized
Make work easier with these features:
- Folders: Keep content organized like you would on your computer
- Labels: Tag content to find it easily
- User logs: See who did what and when
- Feature controls: Choose what features each team can use
Next steps
Need expert support?
Our team is here to help. Connect with our team experts or message us via the live chat for personalized assistance.