Integrate Google Analytics for in-depth tracking and statistics
Learn how to implement Google Analytics tracking code in Flipsnack for more in-depth statistics.
Table of contents:
- Overview
- Integration with Google Analytics 4
- Add the GA4 tracking ID for flipbooks
- Connect your public profile (flipbook library) to GA4
- Next steps
Overview
So you like Flipsnack's statistics but want more granular results. No worries—you can add Google Analytics tracking to all your flipbooks to see visitors' data and traffic stats in Google Analytics.
First, you must have a Google Analytics account. Log in to your Analytics account, and go to Admin. Select the account and the property you want to integrate your flipbook with.
Requirements
- Plan: Professional, Business, Enterprise
- Access: Mid-market and Enterprise accounts
- Admin access to your Google Analytics account.
How to integrate Flipsnack with Google Analytics 4
1. In order to integrate GA4, you need to find your measurement ID. Log in to your Google Analytics account and go to Admin.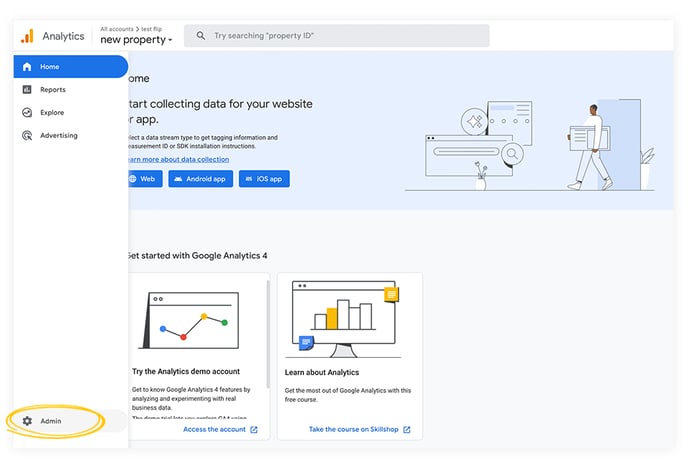
2. Select the account and the property you want to integrate your flipbook with. If you prefer to keep the data for your flipbooks separate from other properties, you can create a new property specifically for tracking the data related to your flipbooks or your profile within GA4.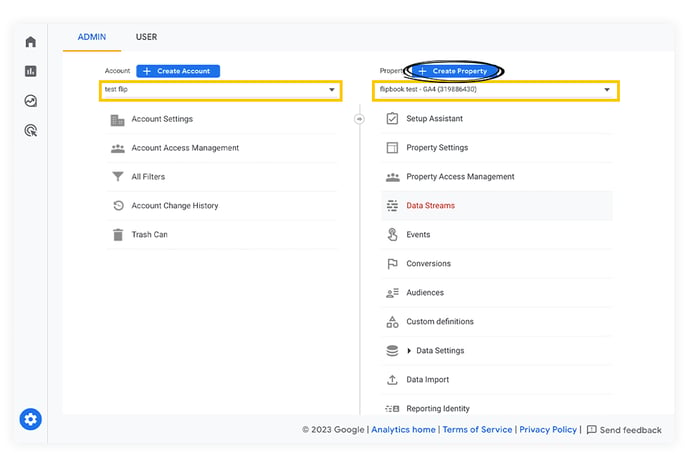
3. Just below your GA4 property in the admin side of Analytics, you'll find the Data Streams option. Click on it.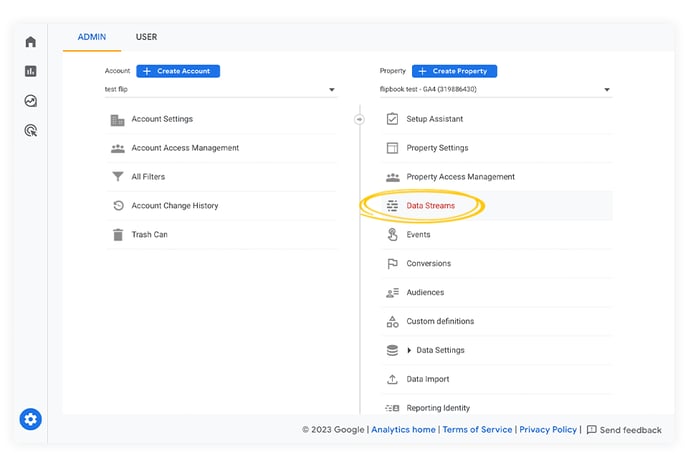
4. Click Add stream and select Web.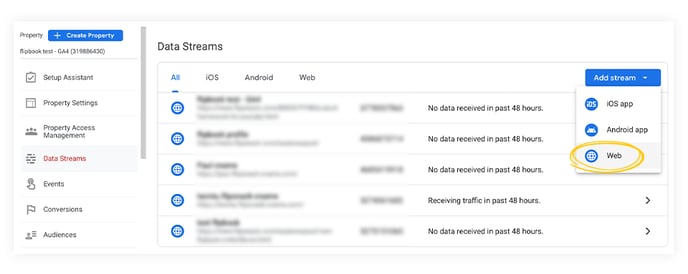
5. Now, enter your Flipsnack website URL and a Stream name (something like Flipsnack catalogs or Flipbooks would be good because it's specific, and you'll always know what the data stream is by simply reading the name. Click Create Stream.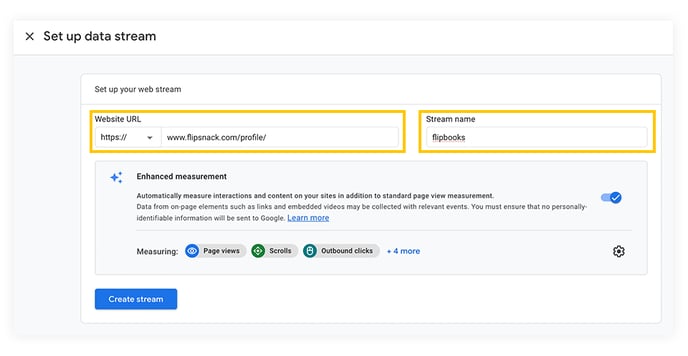
6. Now you just have to copy the measurement ID. The ID starts with "G-" and a string of letters and numbers follows it. Use this ID for all your flipbooks or your profile.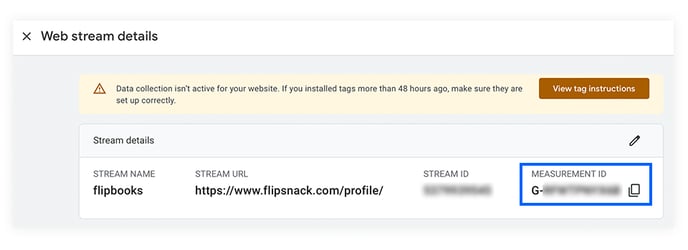
If you have already set up a measurement ID for your flipbooks, then go to the main admin page, click on Data streams, and then on your Flipsnack catalogs data stream. It will automatically take you to the same page described above, and you can copy the measurement ID from there.
How to add the tracking ID for flipbooks in GA4
When adding the tracking ID for each flipbook, you will go even further to see how many users are viewing your flipbooks in real time, where they are located, what traffic sources they came from, and what events they are triggering. Or you will be able to see how users find your flipbooks and what channels drive them to your flipbooks.
Click on the 3 dots menu of the flipbook you want to start tracking. Select Analytics.
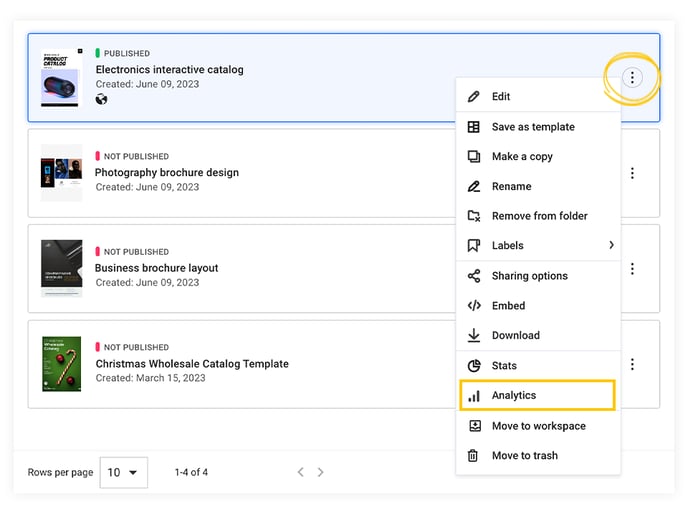
This will take you to the flipbook's customize page, and here is where you can enter your Measurement ID. Once you've pasted the code, click on Save & Share.

Connect your public profile (flipbook library) to GA4
By adding your Analytics tracking ID to your profile, you will be able to track and view data for all of your Flipsnack public links. You only have to set this once, and it will automatically track data on all of your flipbooks. It will also start tracking data whenever you publish new flipbooks.
Note: Integrating Google Analytics for your Flipsnack Profile is available starting with the Enterprise plan.
All this data would be available in your Analytics account, so it’s very easy and convenient to access it whenever you want.
All you have to do is go to Branding (in the main dashboard) > Brand Profile > Settings.
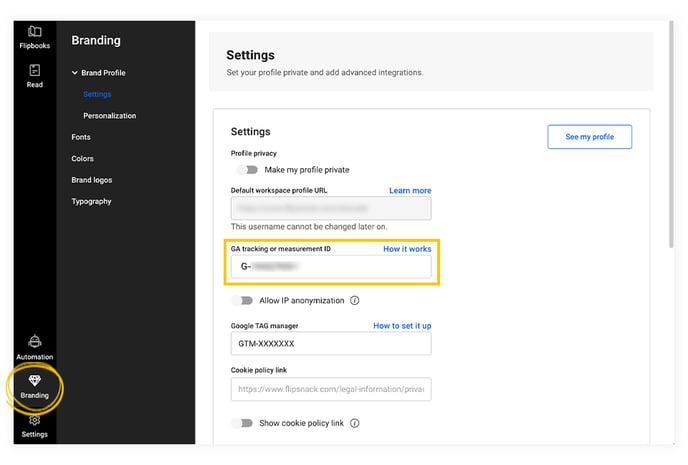
There you’ll find a field where you need to enter your tracking ID.
The tracking ID can be found in your Analytics account, in Admin >Tracking info (in the Property column) > Tracking code.
Tip: Every Analytics property has a unique tracking ID, but for Google Analytics 4, it always starts with "G-" and a string of letters and numbers. That is the number that you need. The Tracking ID must be copied with the G-parameter included.
After you add your tracking ID to your Flipsnack account in the profile section, it will take up to 24h before you see any data in Analytics reports.
That's how easy it is to integrate your Tracking ID / GA4 measurement ID in Flipsnack to track visitor behavior and demographics.
Next steps
Useful resources
To maximize the benefits of this integration, consider:
Need expert support?
Our team is here to help. Connect with our team experts or message us via the in-app chat for a personalized demo.