Table of contents
Overview
The Media Library is a centralized space in Design Studio where you manage images and videos. Upload a file once and reuse it across multiple pages and flipbooks.
From here, you can add new files, reuse existing ones, and quickly find what you need using search and filters.

Key benefits
-
Upload once: Reuse the same file in multiple projects.
-
Stay organized: Keep images and videos in one place.
-
Work faster: Avoid uploading the same asset repeatedly.
-
Quick search: Find files by name or type.
-
Multi-select: Add multiple images to slideshows and shopping elements at once.
Requirements
Plan: Available to all Flipsnack plans
Supported file types:
-
Images: JPG, JPEG, PNG, GIF, SVG
-
Videos: MP4
Audio files (MP3) are uploaded separately through the Audio button and are not part of the Media Library.
Where to find the media library in Design Studio
The Media Library is available in two places:
-
Design Studio → Uploads tab
Open your flipbook and click Uploads in the left-side panel.

-
Interactive elements
It opens automatically when you add or edit:-
Spotlight
-
Slideshow
-
Video button or video embed
-
Product tag
-
Shopping area or Shopping button
-

Sections such as Workspace settings, Branding, My Account, Customize, or Shop settings upload files directly from your computer and do not open the Media Library.
How to use the Media library
Upload a file
-
Open the Media Library.
-
Click Upload.
-
Select files from your computer.
-
Click Insert.
The file is now available for reuse in supported elements.

Reuse a file
-
Add or edit a supported element.
-
Select a previously uploaded file.
-
Click Insert.
You can use the same asset across different pages and flipbooks.
Search and organize
Use:
-
The search bar to find files by name
-
Filters to display only images or videos
-
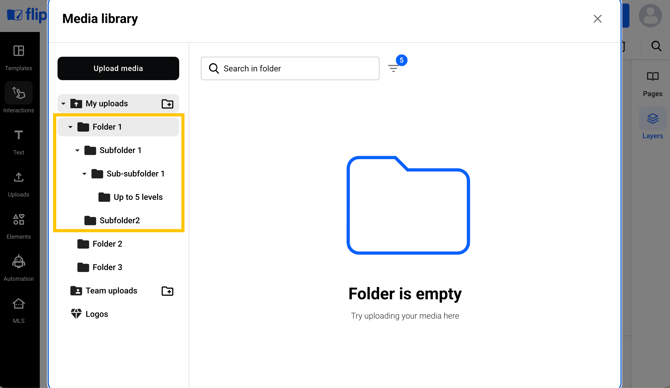
Folders and subfolders: Create nested folder hierarchies under My uploads or Team uploads to organize assets by campaign, client, or project type.
.png?width=670&height=373&name=Screenshot%202026-02-12%20at%2011.34.05-mh%20(4).png)
Additional tips / FAQs
Can I create folders and subfolders?
Yes. You can build custom folder structures, including nested subfolders, directly within the Uploads tab to keep large volumes of brand assets structured across multiple projects.
Can I delete files?
Yes. If a file is used in a flipbook, review the design after deletion.
Are team uploads shared?
In team workspaces, files may appear under My uploads or Team uploads depending on permissions.
Common use-cases
Marketing teams: Reuse product visuals across campaigns.
E-commerce businesses: Keep product images consistent in shoppable flipbooks.
Educators: Maintain consistent branding across materials.
Publishers: Manage magazine and brochure assets in one place.
Troubleshooting
I can’t find my file.
Check search, filters, or My uploads vs Team uploads.
The Media Library doesn’t open.
Make sure you are editing a supported element.
My audio file isn’t visible.
Audio files are uploaded separately through the Audio button.
Next steps
Useful resources
Need expert support?
Our team is here to help. Connect with our team experts or message us via the in-app chat for personalized assistance.