How to automate shopping list orders from Flipsnack to Slack
Learn how to integrate Slack with your shopping list orders so you can receive them instantly, reducing delays and improving efficiency in managing customer requests and catalog sales.
Flipsnack users can now automate the process of receiving customer requests and orders directly in Slack. This integration streamlines workflows and improves order management.
Note: The Slack integration is available starting with the Professional plan.
Follow the steps below to set up this integration:
Step 1: Create the flipbook and add your products
-
Log in to your Flipsnack account and create a flipbook by uploading a PDF or creating it from scratch. Then, you must add your products and publish your flipbook, which can be found in this article that guides you on how to use the shopping list feature.
Step 2: Obtain your API key from Slack
- You'll need to make sure you are signed in to your Slack account.
- Visit https://api.slack.com/ and click on Your Apps in the left corner.

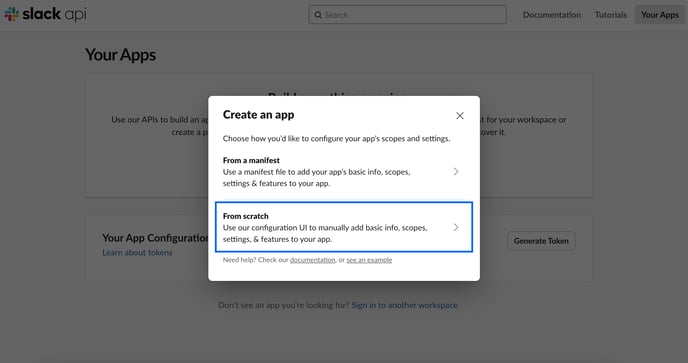
3. Click the Create an App button, then select From Scratch.

4. Then, you will need to configure the name of your app and choose the workspace you want to develop this integration.
Note: If you have more than one workspace, we recommend making one specific for this integration, so you have everything organized to find more easily.
5. After, that click on Create App.

6. Now, you are in the Basic Information section, here scroll down to the Display Information area. You'll need to complete some required information:
- App name - the name of your Slack app, which will be visible to users.
- Short description - a brief overview of what your app does, shown in the app's details.
- Background color - the color that appears behind your app's icon, providing visual distinction.
- Long Description (optional) - a detailed explanation of your app's features and functionality, useful for giving users more context.
Configuring this section is necessary for creating a structured and recognizable Slack app that can be used for integrations.

Click Save Changes.
Step 3: Enable Incoming Webhooks in Slack
Important: You should remain in the Basic Information section, don’t exit the page after you click on Save Changes.
- On the left side of your Slack API dashboard, find the Features section and click Incoming Webhooks.
- Toggle the switch to enable Webhooks.

3. After that, a new section, Webhook URLs for Your Workspace, will appear.
4. Click on Add New Webhook to Workspace.

5. Next, you will have to select the channel where you want to receive orders and click Allow. For exemple, I named my channel in Slack: order-shopping-list to be easily recognizable.

6. After giving permission, you will be redirected to the Incoming Webhooks section again. Now, copy the Webhook URL provided at the bottom of the page.

Step 3: Set up Slack Integration in your flipbook
- Return to your Flipsnack account and choose the flipbook you created in Step 1.
- Find a Shop Button or Shop Area from one of your products in the catalog, and select it.
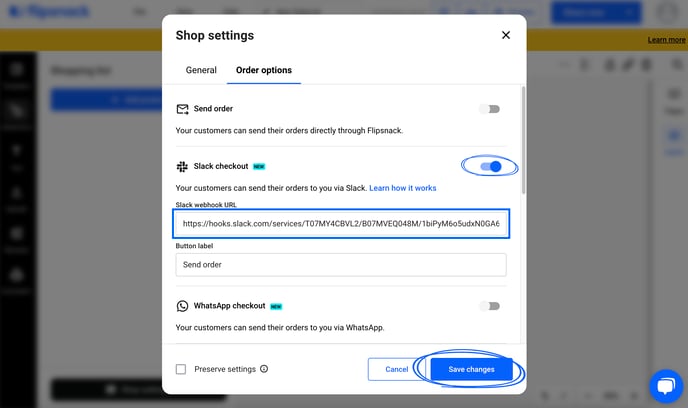
- Then click on the Shop Settings button in the lower left corner, go to the Order Options tab, and enable Slack Checkout.
- Paste the Slack Webhook URL you copied earlier into the Slack Webhook URL field.
Tip: If you want to receive the order via email as a seller and also send a confirmation to the buyer, make sure to check the Send order via email option.

Click Save Changes.
Now, whenever a customer places an order, it will appear in your Slack channel in real-time, making it easy to track and manage them quickly.
The order will look like this, containing the buyer information, order list and total:

And there you have it! You’ve successfully automated the process of receiving orders from Flipsnack to Slack, enhancing your workflow efficiency.
You can also explore additional integrations with Flipsnack to further improve your processes. Check them out here.
Please contact us via live chat if you have any questions or suggestions. We’re always here to help!