Learn how to send form submissions from Flipsnack to Monday, so you can automatically capture and organize responses within Monday.
Overview
Getting form submissions from Flipsnack flipbooks directly into Monday.com can bring significant value, particularly for workflows that rely on form submissions. Although Flipsnack doesn't currently support a direct integration with Monday.com, there are two reliable alternatives you can use to achieve similar results:
- Connect Flipsnack forms to Monday.com via Zapier
- Embedding Monday.com forms directly into your flipbooks
Key benefits
- Convert submissions into actionable tasks
- Streamline lead and data collection
- Customize data mapping effortlessly
Note: The iframe embed feature is only available to Enterprise plan users, and Zapier integration is available starting with the Business plan.
1. Connect Flipsnack forms to Monday.com via Zapier
This option involves a more advanced setup, but it unlocks powerful automation between Flipsnack and Monday.com. Here's how you can get started.
Step-by-step guide
Step 1: Create a Zapier account
Flipsnack integrates with Zapier, allowing you to automatically send form responses from your flipbooks to a wide range of platforms, including CRMs and project management tools like Monday.com. To get started, you’ll first need to create a Zapier account.
Step 2: Create the Flipbook and set up the contact form
Log in to your Flipsnack account and create a flipbook by uploading a PDF or creating it from scratch. Then, you must add a contact form and publish your flipbook. This article will guide you on how to add a contact form to a flipbook.
Step 3: Obtain your API key from Flipsnack
Zapier acts as a bridge between Flipsnack and Monday.com, enabling the two platforms to communicate. To establish this connection, you’ll first need to obtain your API key from Flipsnack.
Here’s how:
- Go to the main dashboard.
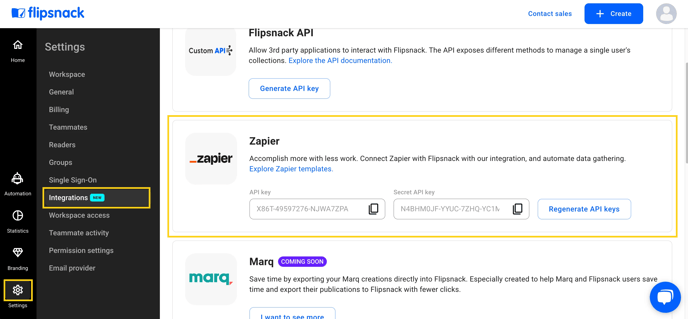
- Navigate to Settings in the lower left corner.
- Click on Integrations.
Locate the API key for Zapier specific to your workspace, click on the Copy icon, next to the code, to copy this key as you will need it for the next steps.
Step 4: Set up a Zap in Zapier
Note: Each Zap is made up of a trigger—an event that starts the workflow—and one or more actions, which are the tasks that follow. In this case, the trigger is a new contact form submission in Flipsnack, and the action is creating a new item in Monday.com.
To begin, head over to Zapier, click the Create button in the top-left corner, and select Zaps from the dropdown menu to start building your workflow. Alternatively, you can use one of our pre-built templates for connecting Flipsnack to various CRMs and apps. These are available on the Flipsnack Integrations page on Zapier.

A new page in the editor will open. Click on the first step, called Trigger. In the search apps modal, type "Flipsnack" and click on the first result, as in the image below.

In the left panel, click on Trigger event, and a dropdown will appear with all the Flipsnack events. Choose New Contact Form Data.

After that, click on Account. When prompted, log in to your Flipsnack account. In the newly opened window, paste the API key obtained in Step 3 and click Yes, Continue to Flipsnack.

Now click on the Continue button and move on to the Configure tab.
Next, select the flipbook where you added the contact form in Step 2, or choose an existing flipbook that includes contact forms. You can easily find it by scrolling through the list or using the search bar. Once located, click to select it. After that, simply choose the specific contact form from the flipbook using the field below.

Click on Continue to move to the Test tab. Here, test the Zap to verify that everything is set up correctly by clicking the Test trigger button. You'll know the setup is correct when you see a green checkmark next to the Test tab.
Step 5: Choose a destination app
After setting up the trigger, choose the app where you want the contact form data to be sent. To do this, click on Action, and you will be prompted to choose an app. In the search apps modal, type "Monday.com" and click on the first result, as in the image below.

In the left panel, click on Action event, and a dropdown will appear with all the Monday events. Choose Create item.

The next step is to obtain the API key from Monday.com. Click on your avatar in the top-right corner and select Administration. From the left-hand menu, go to Connections, then click on the API tab in the top menu. Finally, click the Generate button to create your API key, and copy it for the next step.

Once you’ve copied your API key, return to Zapier and proceed to connect your Monday.com account. Click on Account, and when prompted, log in to your Monday.com account. In the newly opened window, paste the API key and click Yes, Continue to Monday.com.

Now click on the Continue button and move on to the Configure tab.
First, choose the Monday.com board where you want the contact form data to be sent. After selecting the board, you'll need to pick the specific group within that board where the form submissions will be organized.

Next, click the Item Name field, then click the “+” button. You’ll see a list of suggestions from Flipsnack. You can select one or more of the pre-filled options, or enter your own custom value.

Once you've completed all the required fields, you can either click Continue or configure additional fields based on your specific needs. This allows you to tailor the setup for even more precise data mapping and workflow automation.
Click on Continue to move to the Test tab. Here, test the Zap to verify that everything is set up correctly by clicking the Test step button. You'll know the setup is correct when you see a green checkmark next to the Test tab.
After completing the setup, click Publish in the upper-right corner to activate your Zap. From that point on, Zapier will continuously monitor Flipsnack for new contact form submissions and automatically run the corresponding action steps in Monday.com each time the trigger is detected.

You've successfully connected Flipsnack to Monday.com, and your contact form data will now be collected and organized seamlessly—right where your team needs it.

2. Embedding Monday.com forms directly into your flipbooks
A simpler alternative is to embed your existing Monday.com forms directly into the flipbook using an iframe. Here's a step-by-step guide to help you do it.
Step-by-step guide
Step 1: Copy the embed code
Start by logging into your Monday.com account. Once you're in, navigate to the form you want to embed. After opening the form, click on the Share Form button.

A popup will appear with sharing options. Instead of copying the direct link, click the dropdown menu next to the Copy Link button and select Embed.

This will reveal the embed code. Click on the Copy code button to copy it to your clipboard.

Step 2: Embed your Monday.com form in the flipbook
Log into your Flipsnack account. You can either create a new flipbook by uploading a PDF or designing one from scratch or simply open an existing flipbook where you'd like to embed the form. In the Design Studio, click on the Interactions tab and then on Embed code.

Click on the element on the page and paste the embed code you copied from Monday.com in the textbox, on the left side panel. You also have the option to include a cover image, which will act as a placeholder when the flipbook is downloaded in a PDF, JPG, or PNG format.

After pasting it, you can adjust the size and position of the embedded form on the page as needed. The flipbook now contains the Monday.com form.
Additional resources / Next steps
How to automate the export of contact submissions from your flipbook to Hubspot via Zapier
How to add quizzes to your flipbooks
How to add questions to your flipbook
Need expert support?
Our team is here to help. Connect with our team experts or message us via the in-app chat for personalized assistance.