Table of contents
Overview
Integrating Flipsnack with Google Workspace using Security Assertion Markup Language (SAML) allows your organization to centralize user authentication. This setup provides a seamless login experience for team members, enabling them to access Flipsnack using their existing Google Workspace credentials.
Key Benefits
- Centralized Access Management: Control who can access Flipsnack through your Google Admin console.
- Seamless User Experience: Enable automatic sign-in to Flipsnack with organization accounts, reducing the need for multiple passwords.
- Efficient Account Administration: Manage all user accounts from a single, centralized location.
Let's discuss your SSO sharing needs
Requirements
Before you begin, ensure you have the following:
- Google Workspace Super Administrator Account: Required to access the Google Admin console and configure SAML settings.
- Flipsnack Enterprise or Organization Subscription: Ensure that the Single Sign-On (SSO) option is enabled in your Flipsnack account.
Step-by-Step Integration Guide
1. Configure SAML in Flipsnack
- Access Flipsnack Settings:
- Log in to your Flipsnack account.
- Click on your profile icon in the lower-left corner.
- Select Settings > Single Sign-On > Create SSO connection.

Create an SSO connection:
- Navigate to the Single Sign-On tab.
- Click on “Create SSO connection".
- Enter a name and choose SAML as the protocol.
- Then, click Next.

- Keep this modal open and switch to Google workspace in another tab.

2. Set Up a Custom SAML App in Google Workspace
Access the Google Admin Console:
- Sign in to your Google Admin console using your super administrator account.
- From the Admin console Home page, navigate to Apps > Web and mobile apps.
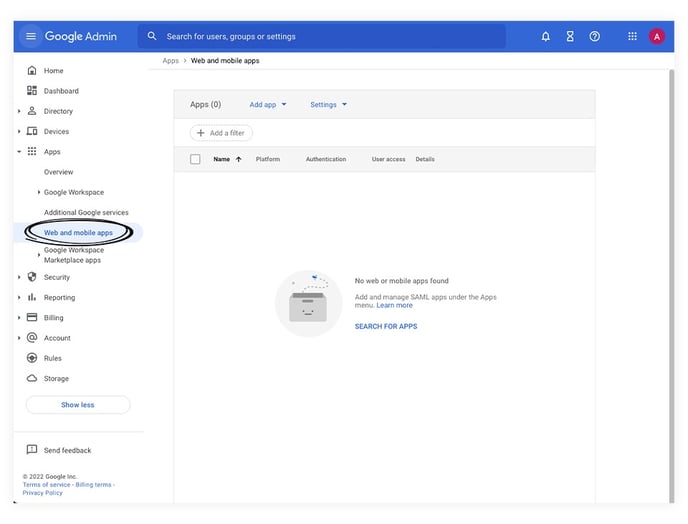
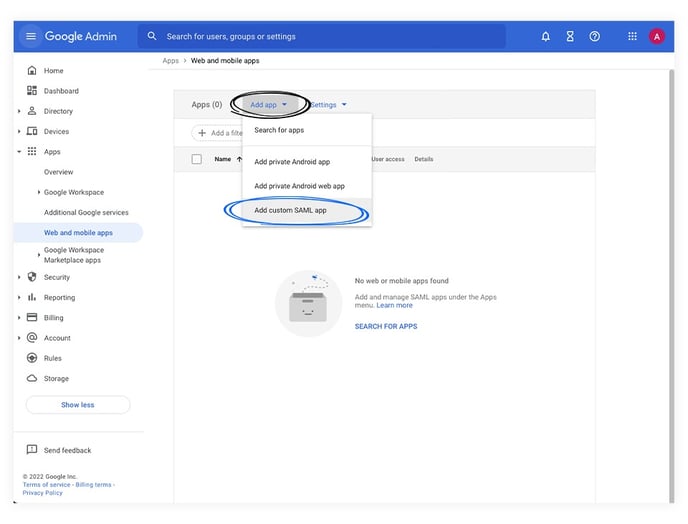
Add a Custom SAML App:
- Click on the Add app button.
- Select Add custom SAML app.
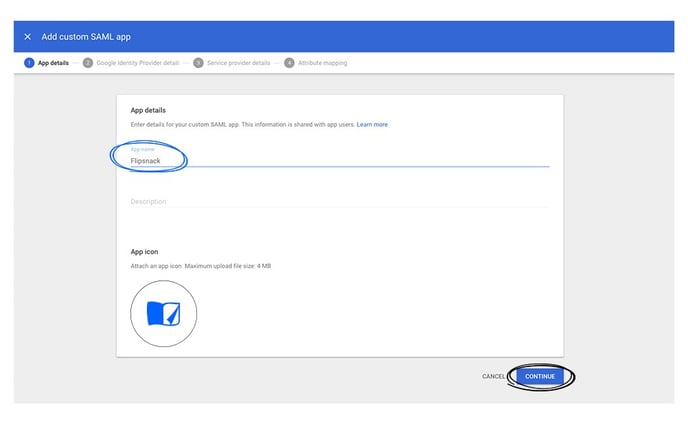
Configure App Details:
- In the App name field, enter "Flipsnack".
- Optionally, upload an app icon for easier identification.
- Click Continue.
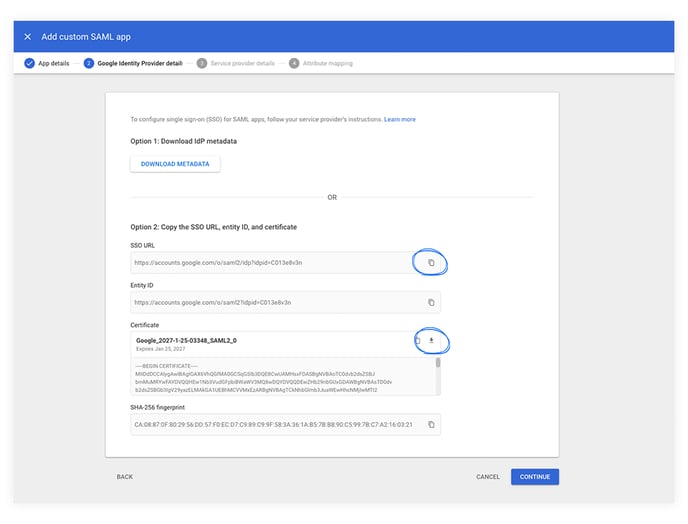
Obtain Identity Provider Details:
- Download the Metadata file (Will be used later).
- Click Continue.
Set Service Provider Details:
- Copy each field from the Flipsnack modal that you have open in the other tab as follows:
- Reply URL -> ACS URL
- Identifier -> Entity ID
- Ensure the Signed response checkbox is not selected.
- Set Name ID format to EMAIL
- Click Continue.

- For basic setup, you can skip this step by clicking Finish.

- Return to the SSO Flipsnack tab.
- Click Next in the modal.
- Upload the metadata file that you downloaded earlier.

3. Enable the SAML App for Users
Assign the App:
- In the Google Admin console, navigate back to Apps > Web and mobile apps.
- Locate the Flipsnack app you created.
- Click on the app and select User access.
- Choose On for everyone to enable the app for all users, or select specific organizational units as needed.
- Click Save.

Important Considerations
- Testing: After configuration, it's advisable to test the SSO login with a small group of users before a full-scale rollout.
- User Provisioning: Ensure that users who need access to Flipsnack are assigned the Flipsnack SAML app in Google Workspace.
- Support: If you encounter any issues during the setup process, consult the Google Workspace Admin Help Center or contact Flipsnack support for assistance.
Next steps:
Discover more efficient ways to keep your documents secure:
Need expert support?
Our team is here to help. Connect with our team experts or message us via the in-app chat for a personalized demo.