Find out how to quickly automate your shopping list area & button to create more product catalogs.
You can improve your catalog with shopping list and show your products efficiently and offer a smooth shopping experience for your customers.
But you can do your work much easier with automation, which allows you to do more work in less time. Forget about manually introducing every detail for each product. You can now upload all the product information as the first step, map out the product details once, and apply them to every shopping option with a simple drag and drop, saving time and streamline your workflow.
Here is how you can set up everything!
Table of contents:
How to set up your CSV file and Google Spreadsheet
How to import your CSV file and Google Spreadsheet
How to add shopping areas and buttons
How to set up the CSV file and Google Spreadsheet for your shopping area and button
You can add all the information in a Google Spreadsheet or create your CSV file in Excel or a similar program. Alternatively, you can download and edit a sample file with the proper information.
Note: The Shopping list automation feature is available with the Enterprise subscription only.
We recommend creating or importing the data sheet for the shopping list area, directly in Google Spreadsheet, because it will be easier to update. It’s important to make sure that your file includes all the necessary information for displaying your product tags (product code/SKU, product name, description, etc.).

Important: To include images in your content, you can first upload the image files to a web server, FTP, or hosting service that allows you to store and retrieve images. Then, you can copy the image's direct URL and paste it into the designated image column.
We are working on a solution that will allow you to host images directly on Flipsnack, making the process even easier.
If you don’t want to display the discounted price or other types of information in your shopping options, you can simply omit them from the CSV file.
However, you can check out more information about CSV files at our help center or contact our support team.
How to import your Shopping list automation CSV file and Google Spreadsheet
Step 1
On the main dashboard, go to Automation, on the bottom left side, click on Import, and then on Import basic data set. As a starting point, we recommend downloading and editing our sample file.


How to add shopping areas and buttons to automate the process
For our visual learners, here's a helpful video that guides you through using the shopping area or button, and what is the best option for your catalog:
Let’s break it step by step for this part!
1. You'll need to go into the Design Studio. For that, go back to the main dashboard, by clicking on the Flipbooks tab, that you will find on the left-side panel. Choose the catalog in which you want to add the shopping area or button, and click on Edit button, in the left side of the flipbook card.

2. After that, on the left-hand side, you will see the Automation section with a list of all the products you've added to your spreadsheet. Drag and drop the product onto the page and adjust it to your liking.
Please click the Preview button in the upper right corner to test if it worked properly.

Tip: You can use the search bar for products when you have a large amount of products in your data set. Simply search using the product title or description between quotation marks. For example, "woman fine watch".
Now, exit the Preview and continue with the next steps.
3. To make the process faster, duplicate the product tag by using Ctrl+D on Windows or Cmd+D on Mac. Alternatively, from the Layers tab on the bottom right side, you can select the product tag and click on the duplicate icon. A duplicated tag will already be connected to the feed.
Once the shopping element is duplicated, you can simply move it over an item on the catalog and drag and drop the corresponding product from the Automation tab. You can then repeat this process as much as necessary.
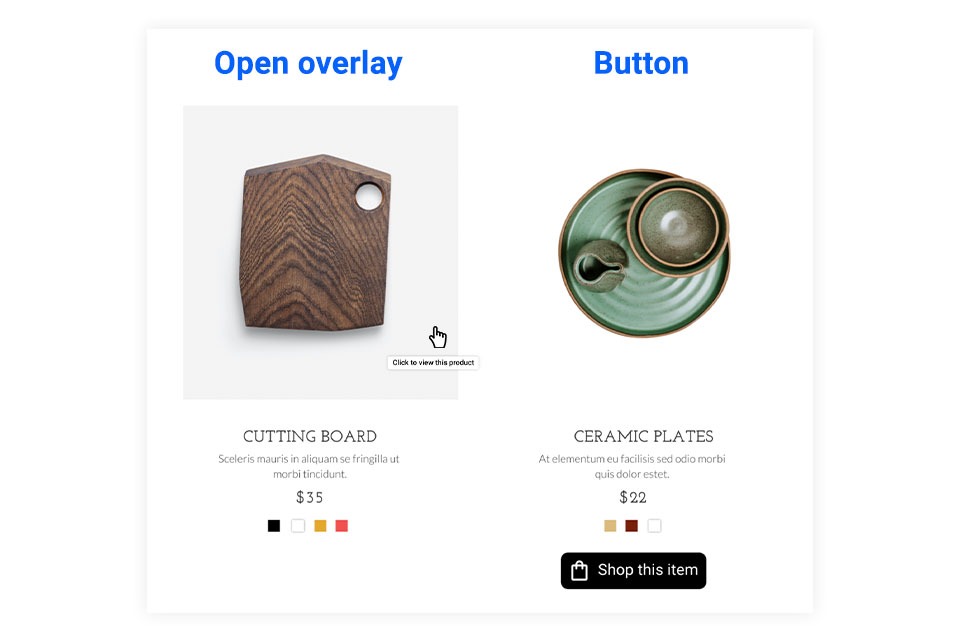
Here is what the preview would look like for each automated shopping option, with the mention that the automation process is the same for each of them:
FAQ
What kind of images are accepted in the spreadsheet? How do I add an image?
Accepted formats include JPG, PNG, and GIF. Add images by placing direct URLs in the appropriate column of your spreadsheet. Learn more.
How can I ensure my data is correctly mapped to the fields in my Flipsnack catalog?
Check your SKU and mapping in the Automation section of your account, for that specific spreadsheet, additionally you can check the product connection in the Design Studio.
Is there a limit to how many products or pages I can create in the catalog?
There is no specific limit, but very large catalogs can affect performance. More info.
If you still have any other questions, feel free to contact us via live chat. Keep the automation going!