Find out how you can automate your catalog production workflow and how the automation tool works.
Automation aims to help you and your team save time by automating the more tedious parts of the process, providing you a break from repetitive tasks like copy-pasting all the content. Learn more about how it can help you from this video here.
Table of contents:
Who can benefit from using automation?
Duplicate info boxes and pages
Who can benefit from using it?
It can help marketers, graphic designers, or agents working in retail-wholesale, finance, real estate, education, or marketing agencies. It’s perfect for whoever is involved in producing a large volume of catalogs by copying data from an external database into presentations or catalogs.
Automation aims to help you and your team save time by automating the more tedious parts of the process, providing you a break from repetitive tasks like copy-pasting all the content.
Let’s dive straight in and find out how we’ll make your catalog production workflow more productive and efficient.
Here is also a video tutorial explaining it:
Note: Before you get started, the automation feature is available with the Enterprise plan.
Step 1: Connect to a data source
First, you need to connect your data source to your Flipsnack workspace. This can be in a Google Spreadsheet, Microsoft Excel, Pages or in a similar program to create your CSV file, but keep in mind that you can connect your data in Flipsnack only through Google Spreadsheet or by uploading your CSV file.
Important: You can add all the information in a Google Spreadsheet, Microsoft Excel, Pages or in a similar program to create your CSV file, but keep in mind that you can connect your data in Flipsnack only through Google Spreadsheet or by uploading your CSV file.
Make sure that your file includes all the necessary information for displaying your product tags (product code/SKU, product name, description, etc.).
Step 2: Connect your data source to a workspace
First, you need to connect your data source to your Flipsnack workspace. Go to the Automation tab that you will find in the lower left corner, there we will set up everything.

From there, click on the Import button, on the right side, and you will see two options: Import basic data set and Import product list. For the example, I will choose the Import basic data set.
Note: The Import basic data set option is to automate different processes with data sets by importing your spreadsheet. The data set can include simple products, content, or general data. The second option Import product list is to automate complex variant-rich products.
The file can be structured however you want, but if you need to view an example, download our sample CSV file, and use it as a starting point.
After that, you can now either click on Upload file to import your CSV file or on Sync Google Sheets to connect a Google spreadsheet.

Warning: We recommend that in the first column you add unique product identification numbers. Once the data source was connected with the flipbook and for the mapping to function properly, the first column and the first row of the data source must not suffer changes.
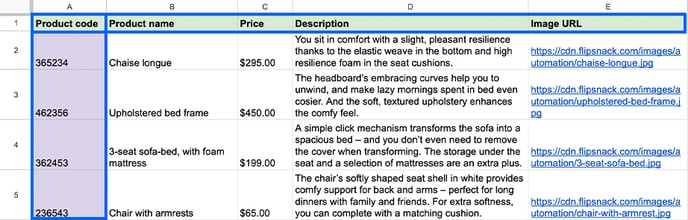
To add images, you can upload the files to Flipsnack. Then, you should copy the direct URL of that image and paste it into the image column. These links should end in .jpg, .png, or other image formats.
In the next step, our system will upload your file. To continue the process, click on the Mapping button that you will find in the Actions column on the left side. Here you can configure the product list preview.

Now, in the pop-up, you can select up to 4 attributes that you want to see displayed in the Automation tab, in Design Studio. Make sure the information you select to appear in the pop-up helps you differentiate between them. In the following video, you will be able to see a preview of how your configuration will look like in Design Studio. This will not impact your catalog in any way.
Note: Also, keep in mind if you want to make any changes in the CSV or Google Spreadsheet, simply synchronize your data at any time by clicking on the Synchronize icon on the Import data sets page.
How to make a design template for automation
Now you can design your own template or use a ready-made template from our collection. Click edit, then skip to the part where I explain how to “create dynamic fields".
But let’s assume that you’re starting from scratch (recommended).
Start by designing for a single product. Add individual text boxes for each type of information that you want to display for each product (Product name, Price, Description, Ingredients, Weight, Colour, etc.). You can also add an image if you have images in your product feed or CSV.
Make the design for one product info box. While designing, make sure your product boxes aren’t too small. The price will probably be just 1 line of text, but maybe the ingredients list will take up 5-6 rows of text. You could even fill in all the boxes with real info if you wanted.
In addition to text boxes and images, you can add other elements to your design (shapes or icons). Images and other static multimedia elements can also pe uploaded as links.
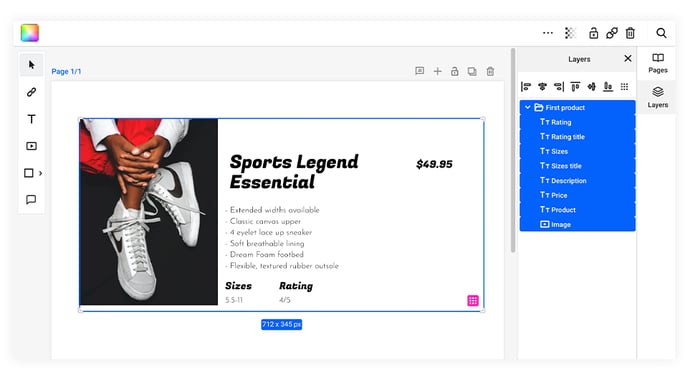
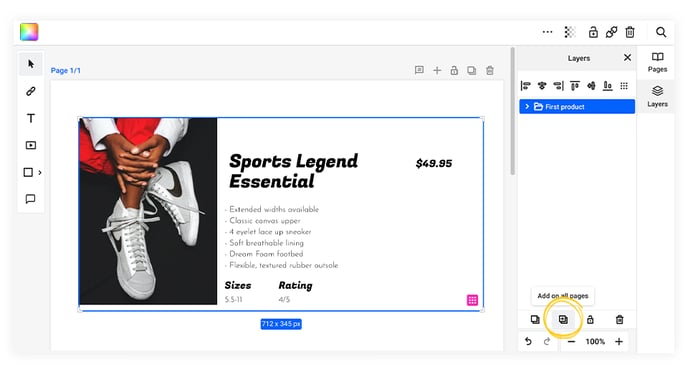
Also, in order to avoid confusion later, it would be better to open the Layers panel and rename all layers according to the type of information they contain.
Create Dynamic fields/Smart fields
The following process will now connect your elements with the feed and make it more easier.
At this point, your design contains regular text boxes and maybe images as well, and you need to turn them into dynamic fields. This way, our system will know what type of info to display in each text box. In order to do so, select one or more text boxes, then click the Connect icon, which is located right next to the trash icon on the top right. It will open a popup asking you to match text boxes with data from within your file.
![]()
Duplicate info boxes and pages
This is useful if you’re building the template from scratch. If you’re not, you’ll just have to do a lot more manual mapping. Skip to the next step.
To do so, select all the elements of the design and click Group, duplicate the product tag by using Ctrl+D on Windows or Cmd+D on Mac. Alternatively, from the Layers tab on the bottom right side, you can select the product tag and click on the duplicate icon. A duplicated tag will already be connected to the feed.
Tip: If you want 20 pages formatted the same way, add 20 blank pages by clicking "+", from the top of the page. Then select all the elements you have on the first page, go to the Layers panel, and click the Add on all pages button or duplicate pages.
Now, you’ll just have to make a design for the catalog's front cover and back cover, and you’re done designing your first flipbook for automation!
Add products with drag and drop
After you duplicate it, you must drag and drop products from the Automation tab, over the smart field groups. Repeat for each product.
Tip: You can search in your file for the product if you have a lot of products listed. You can click on the search bar from the above product list in the automation tab. Use the product’s title or description to drag and drop a specific item easily.
Please contact us via live chat if you have any questions or suggestions.