Table of contents
- Overview
- Steps to integrate the HubSpot cookie banner
- Configuring Google Tag Manager for Consent Updates
- Configuring Tags for Consent in Consent Overview
- Checking your installation in Developer Mode
- Next steps

Overview
HubSpot’s built-in consent manager allows you to implement a cookie banner via Google Tag Manager (GTM), offering similar results to third-party solutions like Cookie Pro by OneTrust.
Note: This setup is necessary only if you have a custom domain. If you are using a standard Flipsnack account, our built-in cookie banner will handle cookie consent for you.
Requirements
Before proceeding, ensure that Google Tag Manager (GTM) is installed on your Flipsnack profile and flipbooks. Google Tag Manager will serve as the central tool for installing and configuring the cookie banner and any other scripts required for compliance.
Follow these guides to set up GTM:
Once Google Tag Manager (GTM) is set up, you can proceed with integrating the HubSpot cookie banner. Additionally, ensure that HubSpot is integrated with Flipsnack for full functionality.
Follow this guide to set up the integration:
Caution: Make sure no other cookie banners are active on your website to prevent conflicts.
Steps to integrate the HubSpot cookie banner
For detailed instructions on configuring your HubSpot cookie banner, refer to HubSpot’s official guide.
-
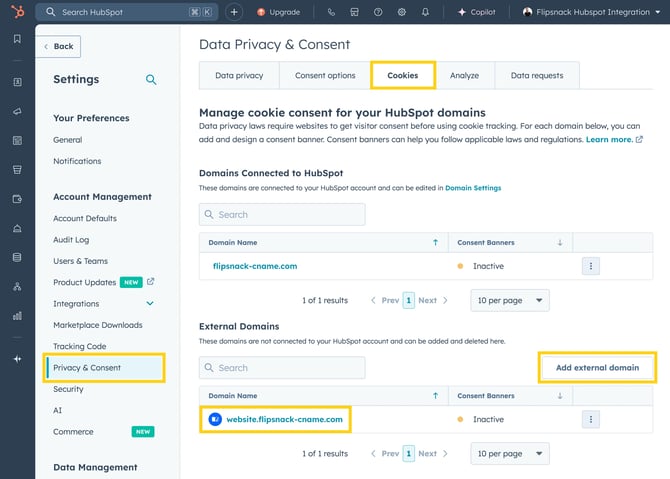
In HubSpot settings, navigate to Privacy & Consent and select the Cookies tab.
-
Add your domain and click on it to manage Consent Banners.
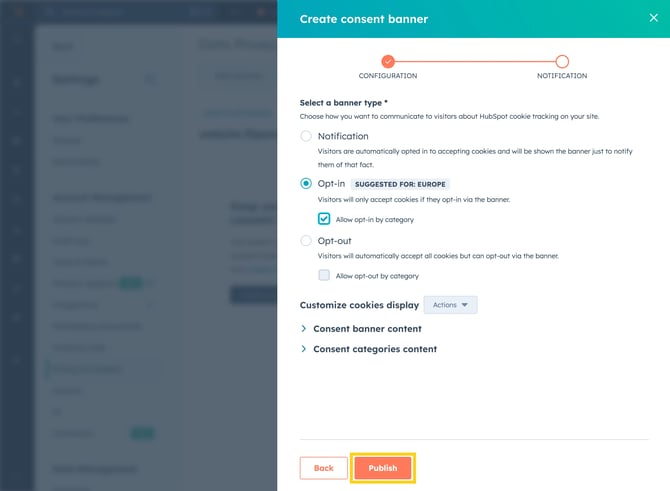
- Click Create Consent Banner and configure it according to your needs.
- Select the style and position of your banner.

-jpg.jpeg?width=670&height=491&name=Screenshot%202025-02-19%20at%2015-06-47-mh%20(1)-jpg.jpeg)
After completing these steps, the cookie banner will appear on your Flipsnack profile page and any associated flipbooks.
-jpg.jpeg?width=670&height=449&name=Screenshot%202025-02-19%20at%2015-06-47-mh%20(2)-jpg.jpeg)
Testing your setup
To ensure your banner is active and working:
-
Open your flipbook in a new tab.
-
Reload and display the latest version of the page.
Configuring Google Tag Manager for Consent Updates
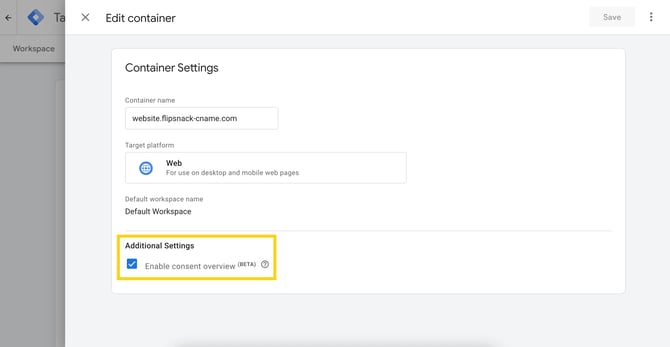
Once the cookie banner is installed and appears on your Flipsnack profile and flipbooks, the next step is to ensure Google Tag Manager (GTM) updates the consent settings when users accept cookies. Make sure you've checked Enable consent overview in the Container Settings (Admin page).
Add a tag to update Consent States
1. Log in to Google Tag Manager and navigate to your Flipsnack-associated container.
2. Click Tags, then select New to create a new tag.
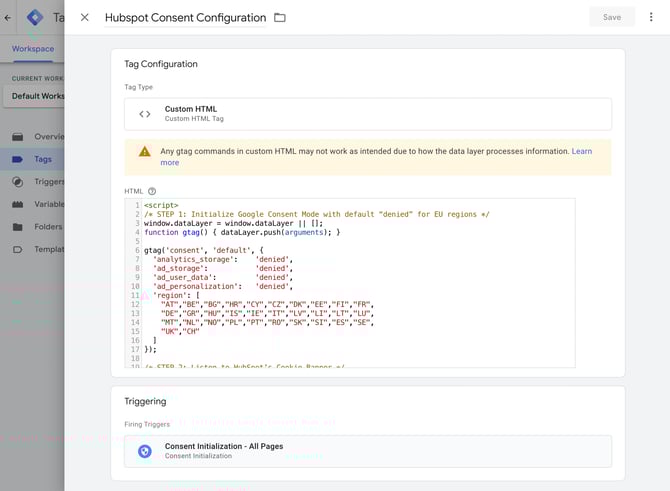
3. Click Tag Configuration and choose Custom HTML.
4. Copy and paste the following script into the HTML field:
<script>
/* STEP 1: Initialize Google Consent Mode with default denied for EU regions */
window.dataLayer = window.dataLayer || [];
function gtag() { dataLayer.push(arguments); }
gtag('consent', 'default', {
'analytics_storage': 'denied',
'ad_storage': 'denied',
'ad_user_data': 'denied',
'ad_personalization': 'denied',
'region': [
"AT","BE","BG","HR","CY","CZ","DK","EE","FI","FR",
"DE","GR","HU","IS","IE","IT","LV","LI","LT","LU",
"MT","NL","NO","PL","PT","RO","SK","SI","ES","SE",
"UK","CH"
]
});
/* STEP 2: Listen to HubSpot Cookie Banner */
var _hsp = window._hsp = window._hsp || [];
function updateGtagConsent(consent) {
if (!consent || !consent.categories) return;
var hasAnalyticsConsent = consent.categories.analytics;
var hasAdsConsent = consent.categories.advertisement;
gtag('consent', 'update', {
'analytics_storage': hasAnalyticsConsent ? 'granted' : 'denied',
'ad_storage': hasAdsConsent ? 'granted' : 'denied',
'ad_user_data': hasAdsConsent ? 'granted' : 'denied',
'ad_personalization': hasAdsConsent ? 'granted' : 'denied'
});
}
_hsp.push([
'addPrivacyConsentListener',
function (consent) {
updateGtagConsent(consent);
}
]);
_hsp.push([
'getPrivacyConsentState',
function (consentState) {
updateGtagConsent(consentState);
}
]);
</script>
5. Click Triggering and select Consent Initialization to ensure the script runs at the right time.
6. Click Save, then Publish the container.
This tag ensures that Google Tag Manager automatically updates Google Consent Mode based on the user's cookie preferences set through the HubSpot banner.
For more details, refer to Google Consent Mode for HubSpot Cookie Banner and Google Consent Mode Overview.
Test with GTM Preview Mode
-
In Google Tag Manager click Preview.
-
Enter the URL of your Flipsnack profile or flipbook and click Connect.
-
Interact with the HubSpot cookie banner and click Agree to cookies.
-
In the GTM Debug Mode panel, verify that the Consent Mode updates correctly based on user selections.

Configuring Tags for Consent in Consent Overview
Once the consent update tag has been added and published, the next step is to configure Consent Overview in Google Tag Manager to ensure that all tracking tags respect user consent preferences.
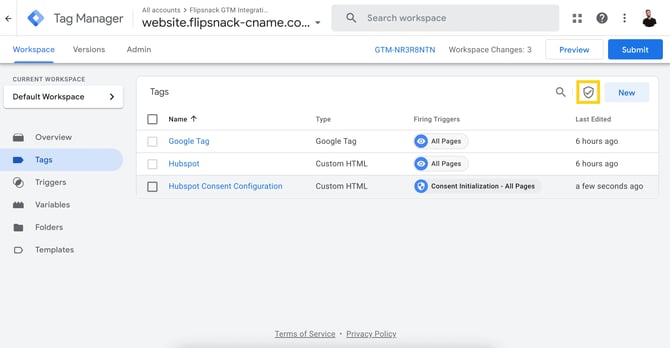
Steps to configure consent in Google Tag Manager:
-
Log in to Google Tag Manager and navigate to your container.
-
In the left menu, go to Admin > Consent Overview > Container Settings > Additional Settings.
-
Enable Enable consent overview to ensure Google Tag Manager automatically enforces consent settings.
-
For each tag requiring consent (Google Analytics, Ads, Facebook Pixel, etc.):
-
Open the Consent Overview tab.
-
Select the tags in the Consent Not Configured section.
- Select No additional consent required if the built-in are set correctly or Require additional consent for tag to fire if there is no built-in consent mode.
-
Choose one of the following consent types (e.g.,
analytics_storage,ad_storage,functionality_storage,personalization_storage,security_storage). -
Set the tags to require the corresponding consent type.
-
-
Save your changes and publish the updates in Google Tag Manager.
-jpg.jpeg?width=670&height=349&name=Screenshot%202025-02-19%20at%2016-28-55-mh%20(1)-jpg.jpeg)
Checking your installation in Developer Mode
-
Open your browser’s Developer Tools (
F12orCtrl+Shift+Iin Chrome). -
Navigate to Application > Storage > Cookies.
-
Select your Flipsnack domain from the list.
-
Look for the number of cookie before and after you accept the cookie banner. Functional cookie will be set at first and the rest of the cookies after you click Accept.

If the consent settings are not updating correctly, revisit your GTM setup and ensure that the HubSpot banner is correctly linked to Google Consent Mode.
Next steps
Explore related customization guides:
- Customize your HubSpot cookie tracking settings and consent banner
- HubSpot Cookie Banner API Documentation
- Google Consent Mode Overview
- Google Consent Mode for HubSpot Cookie Banner
Need expert support?
Our team is here to help. Connect with our team experts or message us via the in-app chat for a personalized demo.