Table of contents
Overview
When using a custom domain or subdomain with Flipsnack, you can choose between:
- The default SSL certificate is provided by Amazon and managed by Flipsnack.
- A custom SSL certificate, giving you more control over your security setup.
Using a custom SSL certificate can help businesses ensure consistency, branding alignment, and greater security control over their connections.
Key benefits
-
Enhanced security: Ensure compliance with your organization’s encryption standards.
-
Brand consistency: Maintain a fully branded URL with a custom SSL certificate.
-
Control over encryption: Manage your security settings rather than relying on third-party defaults.
Requirements
-
Plan: Available for Business and Enterprise plans.
-
Target audience: IT administrators, web security teams.
Technical specifications
Before importing your SSL certificate, ensure it meets the following criteria:
- Key length support: 1024-bit RSA, 2048-bit RSA, and Elliptic Prime Curve 256-bit keys only.
- Matching private key: The private key must correspond to the imported certificate.
- Unencrypted private key: Encrypted keys (password-protected) are not supported.
- File size limit: The private key must be 5 KB (5,120 bytes) or smaller.
- Certificate chain: If applicable, the issuer must be part of the provided certificate chain.
- PEM-encoded format: Certificates, private keys, and certificate chains must be in PEM format.
- Algorithm consistency: The certificate must use the same cryptographic algorithm as the issuing CA (e.g., RSA CA requires an RSA certificate).
- SSL/TLS X.509 version 3: The certificate must be compliant with X.509 v3 standards.
How to import a custom SSL certificate
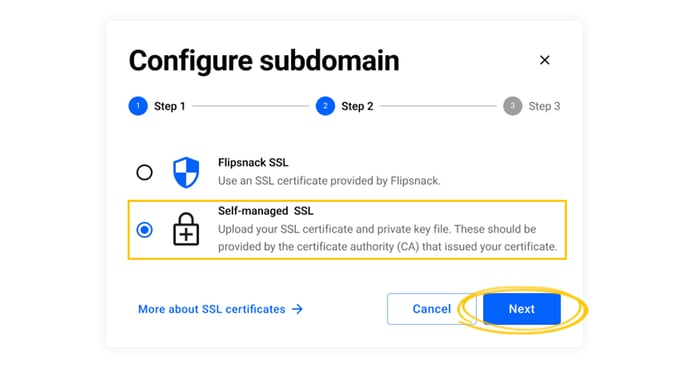
Configuring during subdomain setup
-
When configuring a custom subdomain, choose Self-managed SSL.
-
Follow the same steps to upload and verify the certificate.
-
If you need to revert to Flipsnack’s SSL, you must reset the CNAME record in your DNS settings.
Uploading your SSL certificate
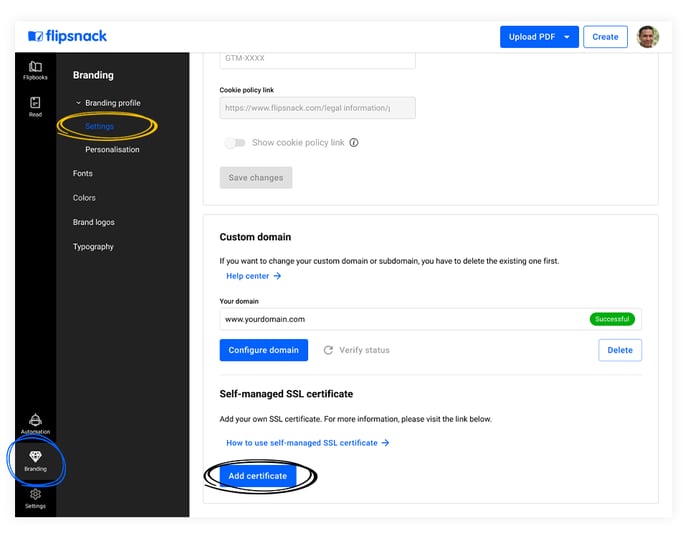
1. Navigate to Branding Settings:
-
- Go to My Flipbooks > Branding > Brand profile > Settings.
- Click on the Add certificate button, under Self-managed SSL certificate.
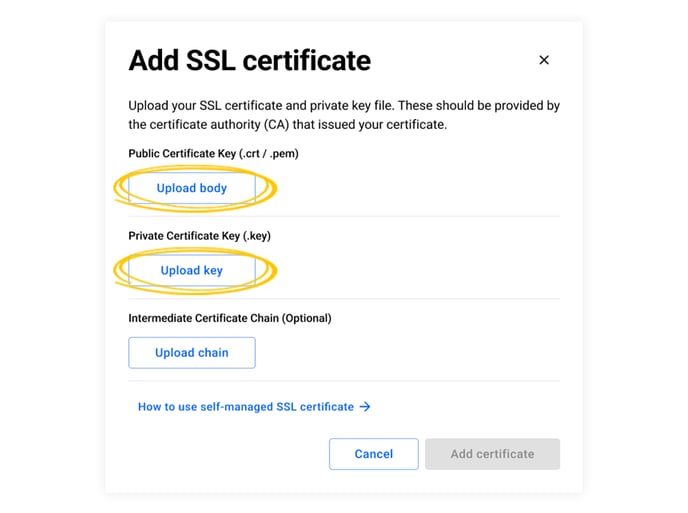
2. Upload certificate files:
-
- Click Upload body to add the public certificate key.
- Click Upload key to add the private key (must match the certificate and be unencrypted).
- Optionally, upload the Intermediate Certificate Chain if needed.
3. Add certificate:
- Once the files are uploaded, click Add certificate.
- If successful, a confirmation message will appear, displaying the certificate status and expiration date.
- The Add certificate button will now be replaced with Replace certificate, allowing future updates.
If you want to switch back to the SSL certificate provisioned by Flipsnack, please keep in mind that you will have to set the CNAME again.
Troubleshooting
-
If an error occurs, a message will indicate the issue, requiring you to restart the process.
-
Common issues include mismatched private keys, incorrect formatting, or unsupported encryption levels.
Next steps
Explore related guides
Need expert support?
Our team is here to help. Connect with our team experts or message us via the in-app chat for a personalized demo.