We all know how important it is to be organized and keep track of work, especially if there’s a large volume of projects and more people involved. If this applies to your Flipsnack account, you’ll be happy to find out that now you can start using labels. Even though anyone can use labels, multiple-user workspaces with large numbers of catalogs will probably make more use of them.
Table of contents:
How to apply labels to catalogs
This feature allows you to label your catalogs in any way you like. Because there are no default values, you can customize and adapt them to your own needs.
So, if you work in a team and many people create catalogs in your workspace, you could use the labeling system to keep track of the status of catalog projects (using labels such as: On hold, In progress, Needs review, Approved, or you could assign labels to catalogs based on which teammate created them: John, Mike, Jane.
Or, you could think of an entirely different way to use labels.
How to create labels
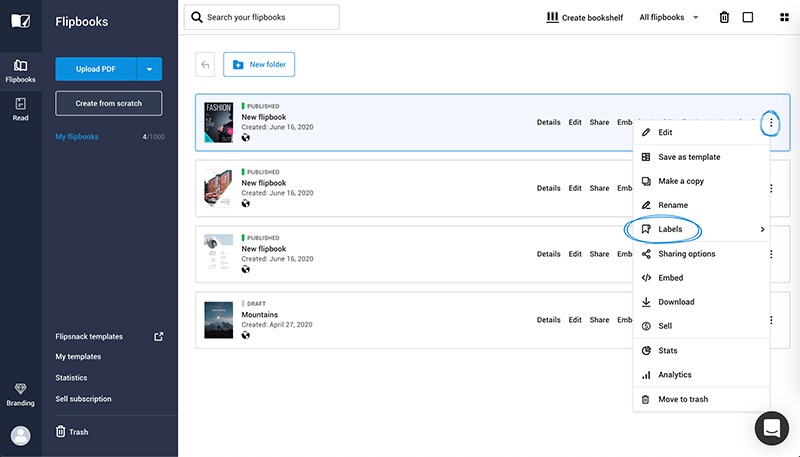
On the main dashboard where you have all your catalogs, click the 3 dots corresponding to a catalog. Select Labels.
Now, you need to create your own labels.
Whenever you want to add a new label, rename an old one or delete the one, you simply go to Manage labels.
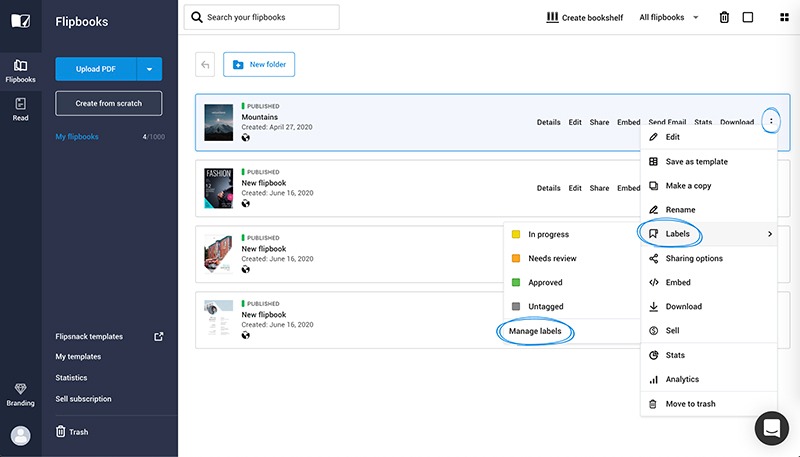
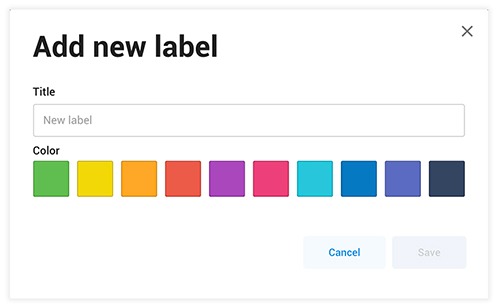
In order to create a new label, set the label value or name, and select a color from a predefined set of 10 colors.
You can create as many labels as you want.
How to apply labels to catalogs
Now that you have a set of labels already created, as explained in the previous part of the article, you just have to go to labels (as explained above) and select the label that you wish to use.
Another way to apply and edit labels on catalogs (even easier) is by using the workflow view in your dashboard.
Workflow view
There are 2 ways to display your catalogs in your dashboard: list view and workflow view. To switch between them, just click the icon on the top right corner.
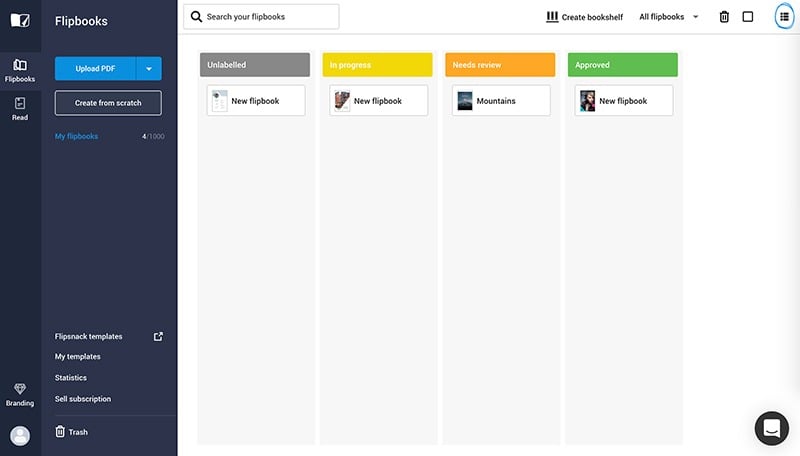
This new view lists all your catalogs based on their labels and helps you manage them.
With the new view, updating the label on a catalog is super easy and super quick. Just drag and drop your catalog from one label list to another label list. That will automatically change its label.
You can also move label lists to the left or to right using drag and drop.
Other important details
You don't necessarily need to label all your documents. You can use labels on all of your catalogs or just a few. It’s up to you.
You can’t set more than one label per catalog.
In order to remove or change a label from a catalog from the standard dashboard, just go to Labels and deselect the label or select a new one.
Simple as that!
The new labels feature is free for everyone - no need to have a subscription.
If you have a lot of projects and labels that aren’t enough for you, you might also want to use folders and subfolders, a free feature that allows you to have unlimited levels of folders and subfolders!
We hope you found this article helpful! Now you can start creating your own labels!