Table of Contents
Overview
The Facebook Pixel is a powerful analytics tool that helps you measure and optimize the performance of your Facebook advertising campaigns. By installing the Facebook Pixel on your Flipsnack profile and flipbooks, you can:
-
Track user interactions and measure ad performance.
-
Create custom audiences based on visitors to your profile and publications.
-
Retarget readers who are engaged with your content.
-
Generate lookalike audiences to expand your ad reach.
Requirements
-
Plan: Enterprise (Google Tag Manager integration required).
-
Facebook Business Manager account with access to Events Manager.
-
Google Tag Manager (GTM) is installed in Flipsnack.
-
Facebook Pixel ID from your Business Manager.
Getting started
Before installing the Facebook Pixel, you need to make sure that Google Tag Manager (GTM) is set up in your Flipsnack account. If you haven’t done so, follow our Google Tag Manager integration guide in Flipsnack. To learn more about setting up and installing the Meta Pixel, visit the official Meta guide.
Setting up the Meta Pixel and adding it to Google Tag Manager
The following steps outline how to integrate Facebook Pixel with Flipsnack using GTM.
Create and get your Facebook Pixel code
1. Log in to Facebook Business Manager and navigate to Events Manager.
2. Click Connect Data Source > Web > Meta Pixel.
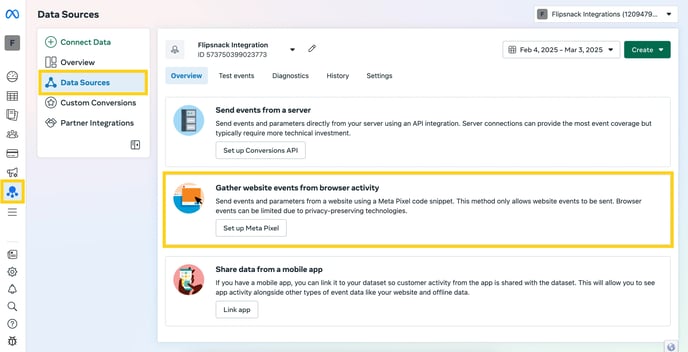
3. Select Set up manually.
-jpg.jpeg?width=688&height=357&name=Screenshot%202025-02-25%20at%2009-14-03-mh%20(1)-jpg.jpeg)
4. Click Copy Code to copy the entire Pixel base code.

5. Optionally, you can activate advanced matching for better targeting.
If you already have a Facebook Pixel, go to Events Manager > Pixel Details > Set Up > Install Pixel and copy the code.
Add the Facebook Pixel Code to Google Tag Manager
1. Log in to Google Tag Manager and navigate to the container for your Flipsnack profile.
2. Click Add a new tag and name it.
3. Click Tag Configuration > Custom HTML Tag.
4. Paste the Facebook Pixel base code copied from Facebook Business Manager.
5. Click the Advanced settings dropdown and select Once per page under Tag firing options.
6. Set the trigger to All Pages to track visits across your Flipsnack profile and flipbooks that have the tag present.
7. Click Save, then Preview and Submit changes.

Create action-specific tag for conversions (optional)
Now that you have your base code installed, you can create specific event-based tags to track actions such as reading a flipbook or clicking a CTA:
1. In Google Tag Manager, click Add a new tag.
2. Name your tag according to the event you are tracking (e.g., "Flipbook Read Event").
3. Click Tag Configuration > Custom HTML Tag.
4. Paste the following Facebook event snippet relevant to the action.
<script>

fbq('track', 'Read Flipbook', {
    content_name: ''
});

</script>
5. Under Advanced Settings, select Once per event under Tag firing options.
6. Click Tag sequencing and make sure your code tag fires first before the event tag.
7. Create a new trigger based on the Element Visibility.
8. Choose the ID as the selector and write player-iframe.

9. Add the Trigger to your tag.
10. Select the Tag firing option to be Once per page and Tag sequencing to make sure the tag fires after the base Meta Pixel Code.
-jpg.jpeg?width=3562&height=1848&name=Screenshot%202025-03-04%20at%2012-51-48-mh%20(1)-jpg.jpeg)
11. Save your tag.
Publishing and verifying the Meta Pixel
Publish your Meta Pixel tag
1. Click the Submit button in the upper-right corner of Google Tag Manager.
2. Add a Version Name and Description (e.g., "Facebook Pixel Setup").
3. Click Publish to activate the tag.
Verify that Meta Pixel is working
Once you've added all your events, verify that your Pixel is tracking correctly:
1. Navigate to your Flipsnack profile or flipbook where the Pixel was added.
2. Open Facebook Events Manager and check the Pixel status—it should display as Active if working correctly.
3. Use the Meta Pixel Helper Chrome Extension to debug and verify the Pixel events fired on the page.

If your Pixel shows "No activity yet," review the tag settings in Google Tag Manager and recheck the firing triggers. Once the Pixel is successfully tracking, you can use it to optimize ad campaigns and maximize conversions across Meta platforms.
Next steps
Now that your Facebook Pixel is installed, you can explore other guides such as:
- How to integrate Google Analytics
- How to add Hubspot to your Flipsnack profile and flipbooks
- Use Zapier to integrate with multiple platforms
For more details, refer to the Facebook Business Guide on Pixel Implementation.
Need expert support?
Our team is here to help. Connect with our team experts or message us via the in-app chat for a personalized demo.