How to set up Hotjar tracking
Install Hotjar heatmaps, recordings & polls on catalogs with Google Tag Manager
We've already published an article where we teach you how to set up Google Tag Manager (GTM) in your account. Before moving on to the actual tutorial, you should know that this feature is included in the Enterprise plan.
If you want to install Hotjar on your profile page and flipbook, first you should read about Google Tag Manager integration to learn the first steps. As you will learn in that article, we recommend setting up a new container in your GTM account for Flipsnack tags.
Once you complete those initial steps, you need to log in to your Hotjar account. If you don't have an account yet, you should sign up for one (it's free).
-
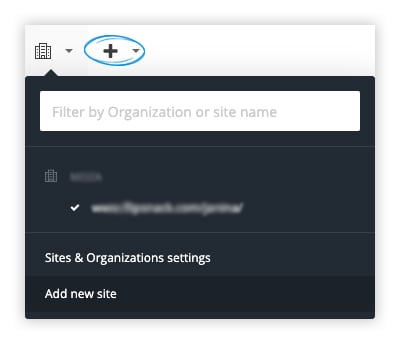
Click on the "+" sign on the top left. Or, click on the Organization icon and then on Add new site.

2. In the Website field, enter your Flipsnack profile URL. If you don't know your profile URL, you should go to Branding - Brand Profile - Settings and copy the URL from the Default workspace profile URL field. If you are using a custom domain/ subdomain, copy that URL instead.
It's very important to use your profile URL; otherwise, the integration will not work.
Site type: Media or Other
Site owner: Select your organization from the list.
Click Add site.

3. There are multiple ways to proceed from here, so I'll show you the easiest one.
Click on the organization icon on the top left, then on your Flipsnack profile URL. It will take you to a new page in which there are multiple options for adding the Hotjar tracking in GTM.
Click on the Install with Google Tag Manager option, then sign in to GTM to connect your account with GTM.

Important: If you don't see the Install with GTM option listed above, it means that you haven't completed all the previous steps correctly.
4. Allow Hotjar all the permissions it needs to create a tag in your GTM account. When you're redirected back to Hotjar, select your GTM account and the Flipsnack container that you have previously created. Then click Create and Publish tag. The tag will be automatically added to your GTM account with the name AUTO Hotjar Tracking Code.
5. You're done, but you will probably want to test the integration now. For example, you can set up a heatmap or set up a feedback poll.
When I went through this process for the first time to test the integration, I first set up an Incoming feedback poll. Just go to Feedback -> Incoming and set up a feedback widget. The process is very simple.
For more information, take a look at how to check that Hotjar is working properly.
Regarding Targeting (step 4): if you want to have your feedback poll appear on all your catalogs and your profile page, select the option On all pages where the Hotjar tracking code is installed. If you only want to use it on a specific page, use the other targeting option. After you review and activate your widget, check your profile page (or targeted page specified in the Targeting step to verify the installation.

You can obviously now create heatmaps and recordings and explore more options in Hotjar, which is an awesome tool.
Important: If you want to activate heatmaps for your catalogs, you should remember that the heatmap is basically a static image of a webpage with click, scroll, or mouse movement colors overlayed on top. This means that the static image will display on the cover of your catalog. Hotjar will not create multiple individual heatmaps for all the pages of your catalogs. If you want to see how people interact with your catalogs, activate Hotjar recordings.
If you still couldn't successfully install your Hotjar tracking code, there may have been updates done to the platform, so make sure to double-check their help center.
Hotjar is a wonderful tool, and we hope you'll make the most of it to learn about your visitor's habits and interaction with your flipbooks.
If you have additional questions, let us know via Live chat. You might not get an instant answer if you have a technical issue, but we'll do our best to help as soon as possible.