
Overview
Edit PDF turns an uploaded vector PDF into editable text, shapes and images in the Design Studio, so you can fix a price, a typo or a translation and republish without going back to the design file. Choose PDF with full editing support (Beta) when you upload, make an editable copy of a flipbook you already have, or convert a single page.
The feature is named Edit PDF, but it also accepts PPTX and ODP files: a presentation uploaded this way is split into editable text and image layers, just like a vector PDF.
Requirements
- Plan: available on all plans: compare plans
- File type: a vector PDF, PPTX or ODP file: how to export a PDF that converts well
Step-by-step guide
Choose how you want to edit your PDF
Depending on what you need to update, you can choose the editing flow that fits best:
- Edit the full PDF: convert the entire uploaded PDF into editable elements inside Design Studio.
- Make an editable copy: create an editable version of an existing publication so you can make updates without changing the original.
- Convert a single page to editable: turn only one page into editable content when you want to update a specific section without converting the full document.
💡 Benefits of editing a PDF inside Flipsnack
- Fix a price or a typo in Design Studio and republish: no trip back to whoever made the file.
- A second language is an edit, not a redesign: the text stays editable, so the layout holds.
- The original can stay untouched: an editable copy leaves the first flipbook as it was, and a converted page can be reverted.
1. Edit the full PDF
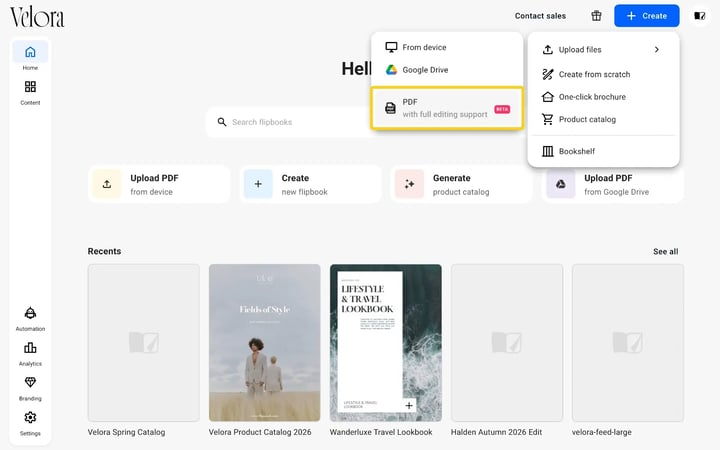
- On the Homepage, click Create in the header, then Upload files and From device.
- Select PDF with full editing support, marked Beta.
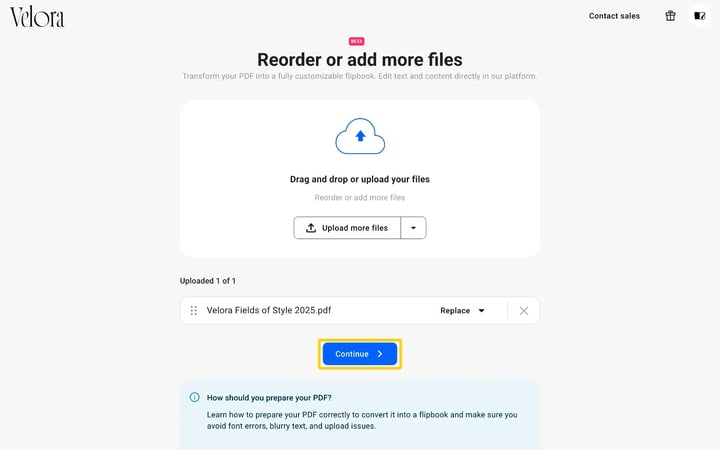
- On the Reorder or add more files page, click Upload more files and choose your file from your computer.
- Click Continue.
Flipsnack opens the file in Design Studio and shows Converting your PDF. This usually takes 1-2 minutes, depending on the file size. You can click Go to my flipbooks and the conversion carries on in the background.
Open the PDF in Design Studio
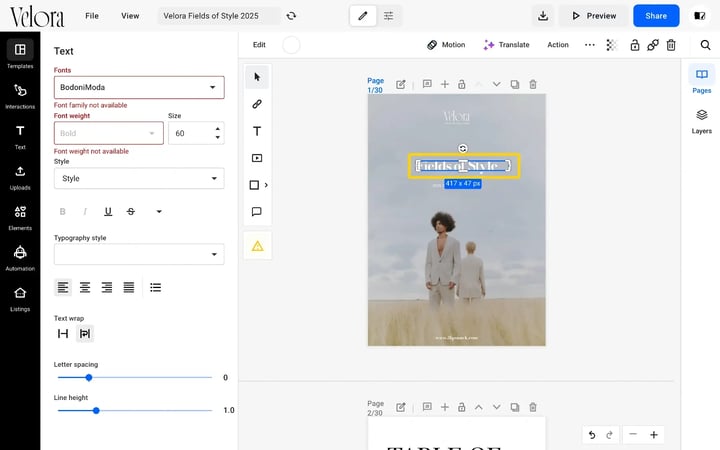
When the conversion ends, the text blocks, images and shapes of the PDF are separate elements on the canvas. Click a text box and edit it with the Text panel on the left. From here you can change:
- The text itself, directly on the canvas
- Font and font weight
- Size, alignment, letter spacing and line height
- Color
Make an editable copy
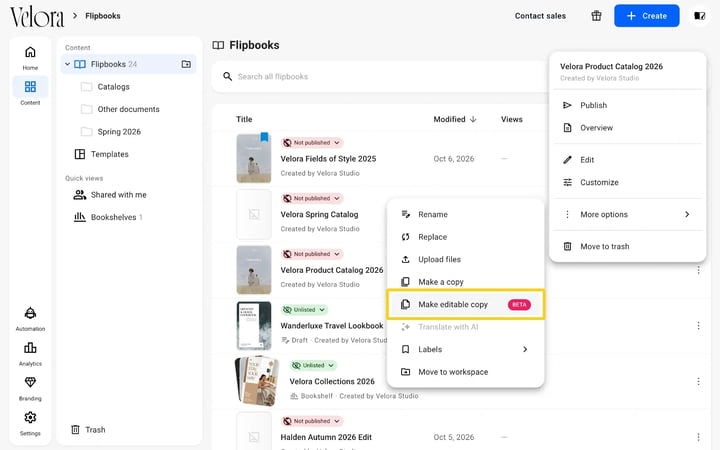
- Go to the Homepage or Content and find the publication you want to edit.
- Click the three dots beside the publication, then More options.
- Select Make editable copy, marked Beta.
- Wait while Flipsnack creates a new editable version of the publication.
- Open the new copy in Design Studio and start editing.
Use this option when you want to keep the original publication unchanged and work on a separate editable version instead. The item shows for flipbooks uploaded as a regular PDF; flipbooks built in Design Studio do not offer it.
Convert a single page to be editable
- Open your publication in Design Studio.
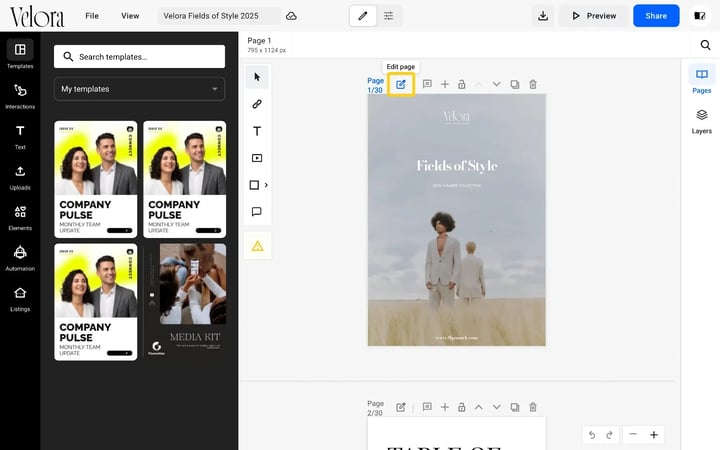
- Go to the page you want to update and click the Edit page icon next to the page number.
- In the pop-up, click Edit page and wait while Flipsnack converts that page into editable content.
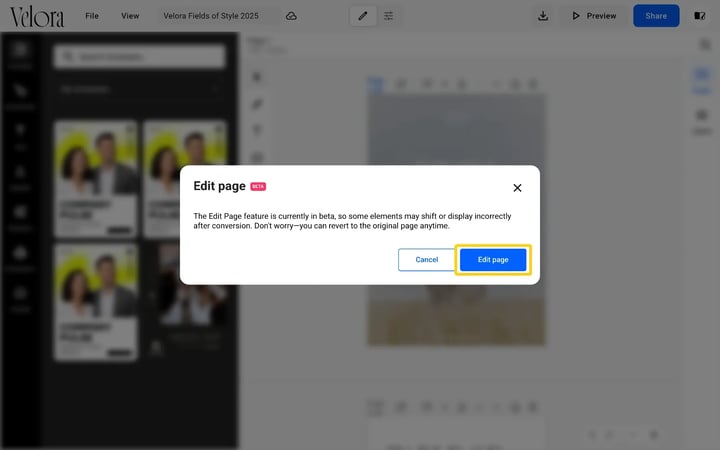
Once the conversion is complete, click the elements on the page and update the text, images or layout as needed. The pop-up notes that you can revert to the original page at any time. Use this option when you only need to update one page and do not want to convert the full publication.
Font availability for uploaded PDFs
Flipsnack preserves the original font from your PDF as accurately as possible. However, some PDFs are optimized and do not embed the full font file. In these cases, the PDF may only contain the characters that were used in the document.
When this happens, the detected font may not exist in the Flipsnack font library, which means we cannot guarantee full editing support. If you select that text, the Text panel shows a red Font family not available warning.
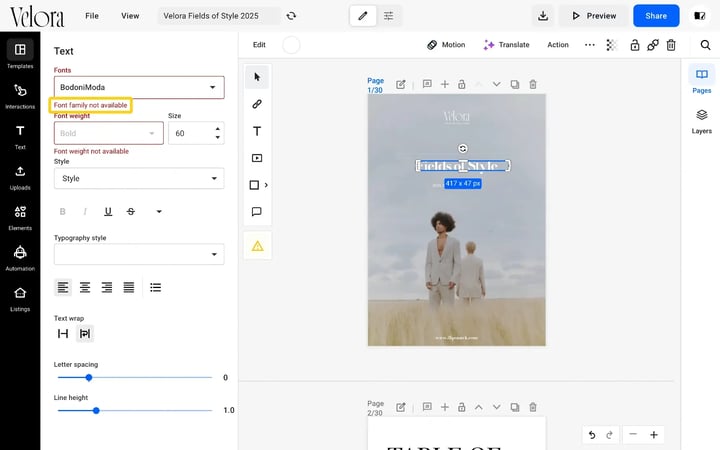
Important: This warning mainly affects editing or rewriting text. If you only want to move the text box, change its position, or adjust its color, everything will work normally.
During the beta phase, use one of these options:
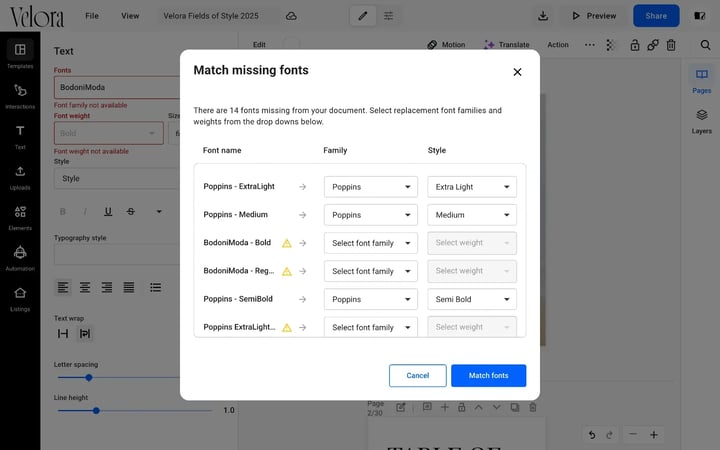
- Match the missing fonts: click the yellow warning icon in the toolbar to open Match missing fonts, pick a replacement family and weight for each missing font, and click Match fonts.
- Replace the font on the selected text with a similar one from the Flipsnack font library.
- Upload the original font to your Branding > Fonts section so it becomes available in the editor.
Edit images
Click an image. Use the options to:
- Replace the image
- Crop it
- Apply filters
- Adjust styling
You can also replace images with assets from your Uploads panel.
Publish your updated flipbook
- Click Share in the Design Studio header.
- Choose a visibility: Public, Unlisted or Private. Under Private, Select private access offers Only me, Password protected, Verify with a code (by email), Your team (Readers), Company SSO and Invite by email. To set a password, read password protected flipbooks.
- Click Publish, or Update if the flipbook is already published.
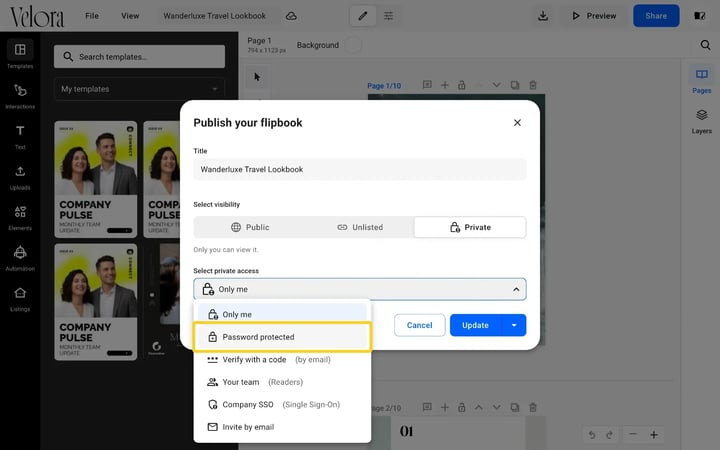
Your updated version will be available online immediately.
Important: Results depend on how the PDF was originally created and whether it contains advanced design effects.
Beta limitations
To ensure your designs transition seamlessly into our editor, it is essential to keep your layouts clean and standardized.
Since our PDF import engine is currently in Beta, certain advanced design effects, like complex gradients, shadows, or clipping masks, may not render correctly. Following these guidelines will ensure your file remains fully functional and looks exactly as you intended.
Beta notice
- Zooming: in some cases, elements may shift positions when zooming
- Layout: For best results, do not export your PDF as spreads. Use single pages only.
- Saving as templates: During this period, you cannot save the imported PDFs as templates
Text and typography
To keep your text sharp and fully editable, follow these technical requirements:
- Embed Your Fonts:
When exporting, ensure you embed the fonts into the document - Keep font files at hand:
If you are using unique fonts that are not in our database, the text will still look correct, but you must upload the font file (.ttf or .otf) to enable full editing capabilities. Even if you embed the fonts, some letters may look off when you try to write them. - Use “Live” text:
Do not convert text to outlines or curves. We need to detect the text in order to allow it to be edited. - Keep it straight:
Avoid placing texts on paths or curves (such as circular or wavy texts) - Avoid text effects:
Do not apply transparency, drop shadows, gradients, or strokes (outlines) to your text. These are not currently supported for typography.
Note: Read this article to find out more about the text and typography requirements.
Images and effects
To prevent your images from “breaking” or appearing segmented after conversion, follow these steps:
- Transparency
You can use transparencies (opacity) on images and shapes, but avoid it on text - Handling Shadows and effects
Drop Shadows or other effects are not fully supported. If you must use them, rasterize the effect into the image itself or as a separate layer. (Note: rasterizing the effects will convert them to non-editable) - No masks
Avoid using clipping masks on images because the system will ignore them.
Shapes and vectors
To maintain a fast, lag-free editing experience, keep your vector elements simple:
- Use Solid colors
Avoid gradients. These will often break during import, resulting in loading failures. - Simplify complex vectors
High-detail vector art (hundreds of paths and small shapes) can cause the editor to lag. Whenever possible, simplify the shapes and paths. - No masks or strokes
Avoid using clipping masks or strokes on shapes. The system will ignore masks and may not render strokes correctly. - Transparency
You may safely use transparency settings on simple shapes.
Note: Segmented or sliced images after import? If your PDF images appear Segmented or sliced, it is likely due to flattening the PDF.To fix this, export your file using a modern standard: PDF-X/4 with compatibility set to at least Acrobat 5 (PDF 1.4).
Alternatively, you can rasterize effects used in the document into single images, but this will render them not editable
Troubleshooting
- The conversion takes a while: it usually takes 1-2 minutes. Click Go to my flipbooks and it carries on in the background.
- A red font warning appears in the Text panel: the PDF did not embed the font. Use Match missing fonts, or upload the original font under Branding > Fonts.
- Images look sliced after import: the PDF was flattened. Export it again as PDF-X/4 with compatibility set to Acrobat 5 (PDF 1.4) or higher.
- Elements shift when you zoom: this is a known limit of the beta. Check the layout at 100% before you publish.
- Make editable copy is missing from the menu: it shows for flipbooks uploaded as a regular PDF. For a flipbook built in Design Studio, use Edit page on the pages you want to change.
Additional tips / FAQs
- Can I save an imported PDF as a template? Not during the beta.
- Should I export my PDF as spreads? No. Export single pages for the best result.
- Which file types work? Vector PDF, PPTX and ODP.
- Can I undo a converted page? Yes. The Edit page pop-up says you can revert to the original page at any time.
Next steps
- Adding links and interactive elements
- Publishing and visibility options
- SEO optimizing your flipbooks
Need expert support?
Our team is here to help. Connect with our team experts or message us via the live chat for personalized assistance.