Learn how to run Google Ads retargeting campaigns for catalog visitors
How to add the Google Ads Remarketing Tag and Google Ads Conversion Tracking Tag using Google Tag Manager.
Many Enterprise users leverage our platform to promote their products and services. This guide explains how to use Google Tag Manager to send data from your Flipsnack profile or custom domain to your Google Ads account.
The reason this is valuable for your business is that it helps measure how effective your Flipsnack materials are in converting readers into customers. This guide will also cover how to add the Remarketing tag, which helps target ads at people who have read your catalogs.
Table of Contents
Overview
Google Ads tracking allows you to measure the performance of your Flipsnack publications in converting readers into customers. By integrating Google Tag Manager (GTM) with your Flipsnack profile and custom domain, you can track user behavior and improve your advertising strategy.
This guide will walk you through the process of setting up Google Ads Conversion Tracking and Google Ads Remarketing Tags to enhance your digital marketing efforts.
Key Benefits
-
Measure ad effectiveness: Track how well your Flipsnack materials convert readers into customers.
-
Retarget engaged users: Show ads to users who interacted with your catalogs.
-
Improve ad performance: Use insights to refine and optimize ad strategies.
-
Automate audience creation: Build remarketing audiences based on visitor behavior.
Requirements
-
Plan: Enterprise
-
Google Tag Manager: Installed and configured on your Flipsnack profile and flipbooks.
- Google Ads Account: Connect with your Google Tag Manager container.
- Conversion Linker: To ensure accurate data and conversion tracking across multiple domains.
-
Conversion Goals: Define them in Google Ads before setting up tracking tags.
Getting Started
Understanding Google Ads Tags that you can use with Flipsnack
-
Conversion Tag: Tracks specific user actions that bring them closer to becoming customers.
-
Remarketing Tag: Tracks visitors for retargeting ads or to create similar audiences.
Example Use Case
If you run an online retail business and use Flipsnack for catalogs, Google Ads Conversion and Remarketing tags allow you to:
-
Track if visitors to your catalogs later make a purchase.
-
Show ads related to specific products a visitor viewed in your catalogs.
-
Measure the role of your flipbooks in the customer journey.
Setting Up Conversion Goals in Google Ads
Before adding the tracking tag in GTM, you need to set up a Conversion Goal in Google Ads:

1. Sign in to your Google Ads account.
2. Click on Goals.
3. Click the + New conversion action button.
4. Select Website as the conversion source.
5. Enter your Flipsnack profile or flipbook URL and click Scan.
6. Choose the type of conversion you want to track (e.g., profile page visits or read flipbooks).

7. Set up the conversion details, including category and value.
8. Click Create and Continue, then select Use Google Tag Manager.

9. Copy the Conversion ID and Conversion Label for later use.

Setting Up the Conversion Tracking Tag in Google Tag Manager
1. In Google Tag Manager, create a new tag:
-
-
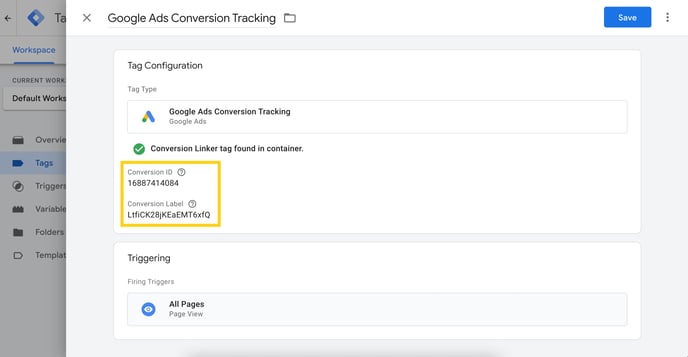
New Tag > Tag Configuration > Google Ads > Google Ads Conversion Tracking.
-
2. Copy the Conversion ID and Conversion Label you created in Google Ads.
3. Return to Google Tag Manager and enter the copied Conversion ID and Conversion Label to your tag configuration.

5. Preview and publish your changes.
Installing the Google Ads Remarketing Tag
1. In Google Tag Manager, create a new tag:
- New Tag > Tag Configuration > Google Ads > Google Ads Remarketing Tag
2. Copy the Conversion ID and Conversion Label you created in Google Ads.
3. Return to Google Tag Manager and enter the copied Conversion ID and Conversion Label to your tag configuration.

5. Preview and publish your changes.
Next Steps
Useful Resources
To learn more about this subject, visit:
Need Expert Support?
Our team is here to help. Connect with our team experts or message us via the in-app chat for a personalized demo.