
Overview
Managing a massive volume of media assets across multiple brands, projects, or catalogs can quickly become overwhelming. Flipsnack's Media library subfolders feature offers a structured, nested asset management system directly inside the Design Studio.
👥 Where subfolders are helpful
- Regional & Campaign Assets: Keep seasonal campaign materials or regional product images nested under distinct folders (e.g., My uploads > 2026 Campaigns > Summer > US Region).
- Multi-Variant Catalogs: Group product variation images by color, size, or style finish inside distinct nested subfolders before adding them to your interactive shoppable areas.
- Brand Kit Resource Hubs: Store master logos, icons, and official graphics within shared Team uploads folders so all workspace creators access the same source of truth.
Instead of dealing with a flat, cluttered list of files, you can organize your uploaded images, videos, and graphics into structured folder trees. This enables your team to locate exactly what they need in seconds, streamlining your content production cycles and protecting brand consistency.
Requirements
- Role: Workspace Owners, Administrators, Editors, and Agents: about roles
- Workspace permissions: Workspace Owners, Administrators, Editors, and Agents can create, rename, delete, and move folders within their respective uploads directories: about roles
How to create and manage folders and subfolders
Folders and subfolders are created contextually whenever you configure interactive elements on your canvas.
Step 1: Open the Media library modal
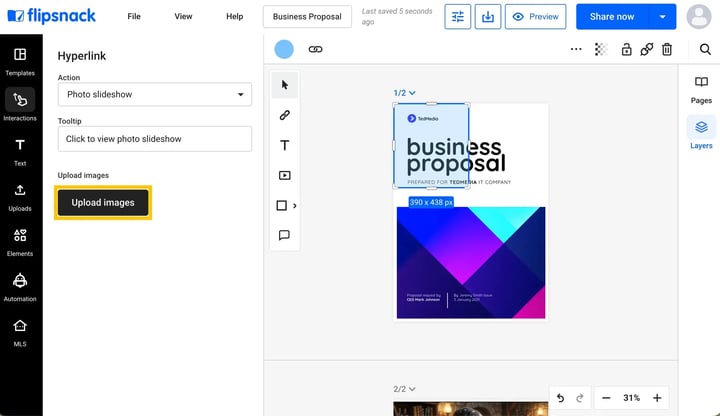
To open the file manager modal, you must click on an interactive element that requires media uploads. For example, add a Photo slideshow, Spotlight, Video button, or Product tag to your canvas.
In the element settings panel on the left, click on the Upload images or Upload media button. This will automatically open the Media library modal.
Step 2: Create a folder structure
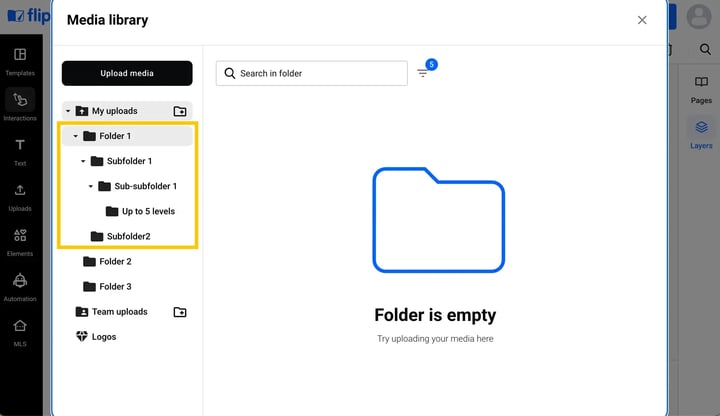
Once the Media library modal is open, you can begin structuring your directory tree:
- Select either the My uploads tab (for your personal file directory) or the Team uploads tab (for shared files accessible by your entire workspace team).
- Click on the New folder icon (represented by a folder icon with a plus sign
+) next to the directory heading. - Type a descriptive name for your new folder in the prompt field and click OK.
Step 3: Nest subfolders up to 5 levels deep
You can create nested folders up to 5 levels deep to support highly complex directory structures:
- Click on your newly created parent folder to open it.
- Click the New folder icon at the top of the directory tree.
- Name your subfolder and confirm by clicking OK.
- Alternatively, hover your mouse over an existing folder, click the three-dot option menu, and select New folder to generate a nested child folder.
Step 4: Move assets into folders and subfolders
Once your subfolders are ready, you can move existing or new uploads into them:
- Hover your mouse over any image or video asset inside the modal.
- Click on the three dots in the upper-right corner of the asset thumbnail.
- Select Move to from the dropdown options.
- Choose your target subfolder from the folder tree directory and confirm the action.
Troubleshooting
"The folder is empty" message is displayed
- Deleted folder's contents: Double-check that you have chosen the correct subfolder level. If you delete a folder, its contents are automatically moved back to the main uploads library root directory, rather than being deleted permanently.
Can I move an entire subfolder?
- Can't drag and drop folders: Subfolders must be managed at their current nested position. You cannot drag and drop entire folders to change their hierarchy level yet; instead, move the files inside to your desired parent folder.
Next steps
- Using the Media Library in Flipsnack
- Uploads in Design Studio
- Team & personal uploads in Design Studio
- How to download images and videos that I uploaded to Flipsnack?
- support team
- in-app chat
Need expert support?
Our team is here to help. Connect with our team experts or message us via the live chat for personalized assistance.