Arranging elements on page
Learn how to arrange the elements in your flipbook with a few simple clicks.
Arranging elements on the page is very easy. Let’s see together how this can be done.
Arranging the layer order on a page
When you’re designing more complex publications, overlaid layers can become difficult to deal with, especially if they’re not set in the order you imagined them in. But in Flipsnack, you can arrange their order quickly and easily. There are a few ways you can do this in our Design Studio.
You can arrange the order of layers on a page by selecting Move forward or Move backward from the contextual menu (right-click on the element you want to be arranged).
You can drag and drop layers from the Layers menu on the right.
Or, you can simply select the element you want to arrange, click the Arrange button in the upper-right corner of the editor, then select the desired option.
-1.gif)
-
Forward - brings the selected element on top of the rest of the elements;
-
Back - sends the selected element behind the rest of the elements;
Aligning elements on a page
In Flipsnack, there is a wide range of options when it comes to aligning elements on a page. You can use features such as tidy up, smart guides, or rulers, and they will all help make your publications look more professional.
When using guides, or rulers, you can select multiple elements and align them all at once to the existing rulers or to other groups of text and images.
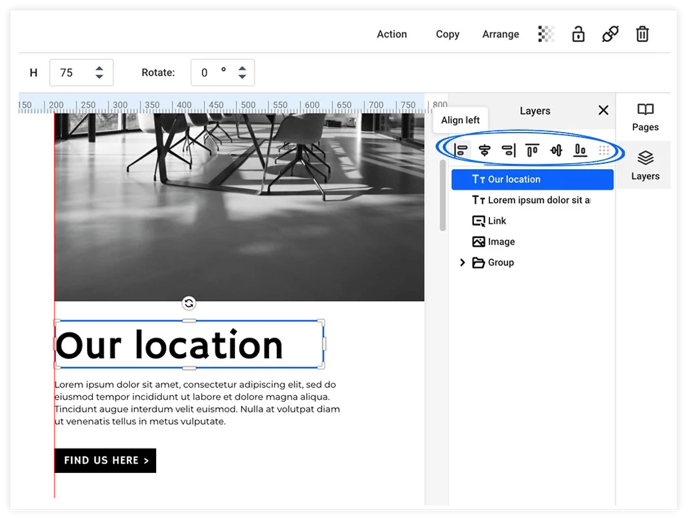
But you can also align elements from the contextual menu (right-click on the element and choose Align) or you can select the preferred alignment from the Layers menu:

-
Top - places the selected element at the top of the vertical axis it is placed on;
-
Middle - places the selected element in the middle of the vertical axis it is placed on;
-
Bottom - places the selected element at the bottom of the vertical axis it is placed on;
-
Left - places the selected element on the left side of the horizontal axis it is placed on;
-
Center - places the selected element at the center of the horizontal axis it is placed on;
-
Right - places the selected element on the right side of the horizontal axis it is placed on.
Please let us know what you think via live chat.